Reading & Development: 2 hours
Overview
This guide walks through the steps to access a patient’s My Health Record using the GainPCEHRAccess web service. When gaining access to a patient’s My Health Record, it is important to understand Access Codes and Emergency Access.
It is useful to note that GainPCEHRAccess is not required to upload a clinical document to a My Health Record.
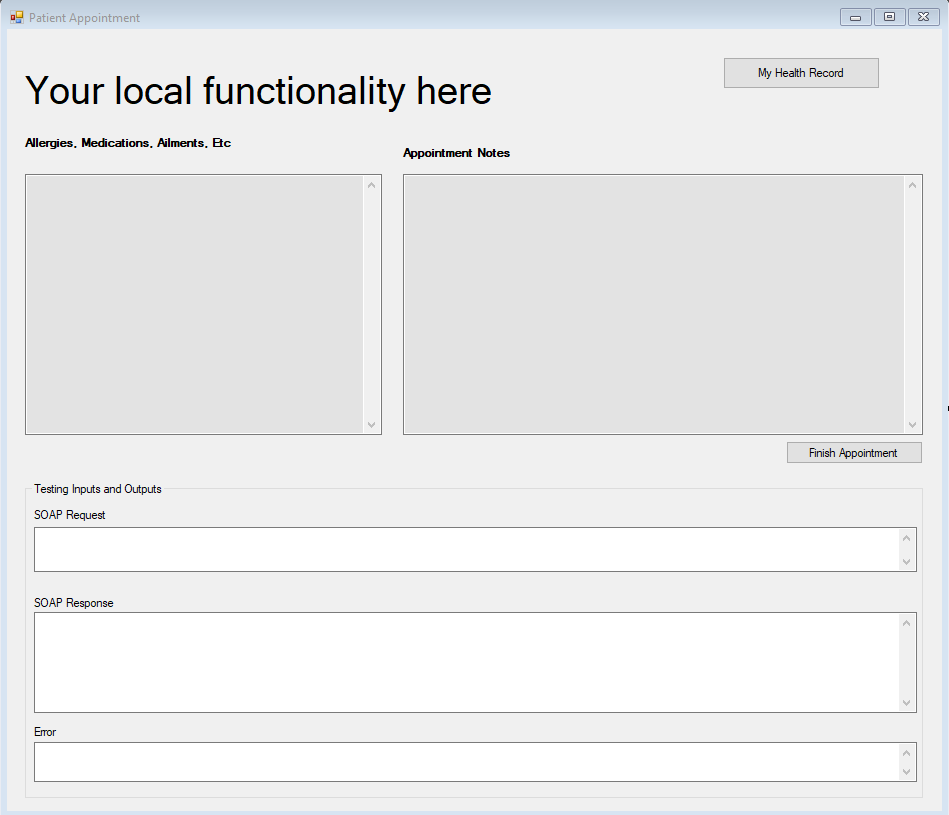
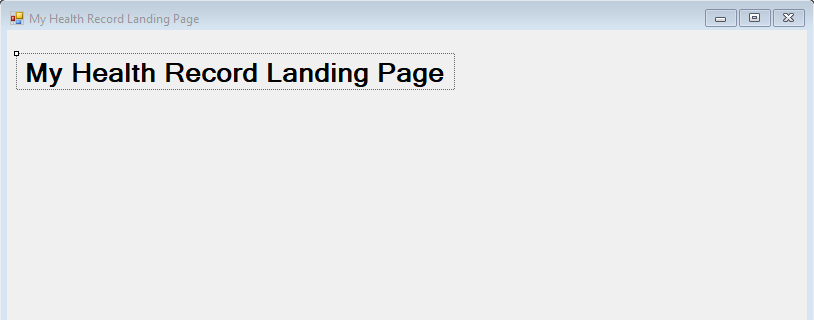
At the end of this walkthrough, you'll have a mock-up of an overly simplified patient appointment screen (created in the previous guide) with a My Health Record button that opens a patient’s My Health Record Landing Page or prompts the user for an Access Code. Note that there is no specific definition of a My Health Record landing page but advice will be provided as to what to display when a My Health Record is viewed by your users.
Pre-requisites
Before you begin stepping through this guide, you will need to have completed the My Health Record B2B Gateway - Find whether a My Health Record exists guide.
Step 1: Background Information
By default, a My Health Record does not have any Access Codes set, however ~2% of users have implemented Access Codes. Patients can restrict access to specific documents or to their entire My Health Record, they do this by setting a 4-6 digit Access Code on their entire record (a Record Access Code, RAC) or just to a subset of their documents (a Limited Document Access Code, LDAC). The patient can then provide these codes to their healthcare providers as they deem appropriate.
Important!
You should take 10 minutes to read these 3 consumer pages on the RAC, LDAC, and Emergency Access. The Access Code pages have short 2-minute videos and we recommend watching them.
If both codes are set up by the consumer they cannot be the same, this is important to your implementation as the user of your software may be prompted to enter one. If both a RAC and LDAC are used by the patient and your user enters the RAC, they will not see any documents restricted with an LDAC. If your user enters the LDAC they will see the entire record including restricted documents. This can seem counterintuitive and should be understood clearly.
There is also a requirement that your software may allow the healthcare provider ‘Emergency Access’ to a patient’s My Health Record as a ‘break glass’ feature in the case of an emergency.
Step 2: Workflow
In this section we will provide some advice as to how to implement My Health Record within your UI and existing workflows. Some components of this section is optional however usability should be kept in mind for your implementation. You should always undergo your own assessment of your My Health Record implementation and whether the advice is suitable for your software.
In the previous guide we conducted a DoesPCEHRExist web service call to understand whether the patient has a My Health Record. In the response from DoesPCEHRExist we are notified whether the patient has a RAC set within the accessCodeRequired property.
As demonstrated in the previous guide, we recommend that you conduct a background DoesPCEHRExist upon a patient record being opened (or similar) and cache the return values including the accessCodeRequired property, this can drive a simplified mechanism for opening a patient’s My Health Record if a RAC is not set by the patient.
Within the patient appointment (or similar) screen you may have a My Health Record button which opens the patient’s My Health Record in 2 different ways depending on the value of accessCodeRequired.
1. If a RAC is not required (98% of patients): Open a My Health Record ‘landing page’ which would likely open a Health Record Overview, document list, or some other summary content.
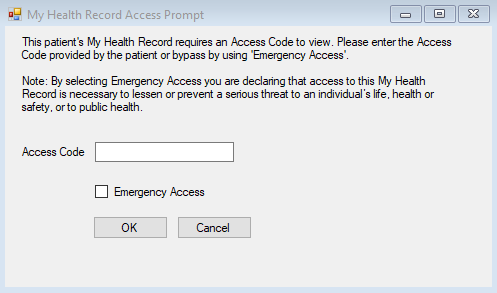
2. If a RAC is required: Open a prompt giving the user an option to enter the Access Code or use the Emergency Access feature.
If using this mechanism, the ‘landing page’ area must still have the 2 options for the user to enter an Access Code and to gain Emergency Access. This is a requirement. These options would be specifically for patients who have LDACs set, although your system would not be aware whether an LDAC was set. This means that users may call GainPCEHRAccess again any time throughout a viewing session.
We will use this workflow in our examples below.
Important!
You will likely want to use the My Health Record logo in your software. Please see the My Health Record Brand Identity document, specifically pages 5 & 6 for guidance on logo use. Briefly familiarise yourself with this document now.
Step 3: Add GainPCEHRAccess code
In the following steps we will use accessCodeRequired to identify whether the user will need a RAC to gain access to the patient’s My Health Record and set a local boolean.
Step 3.1. Add GainAccessWithCode property in Patient Appointment Form class file.
public bool GainAccessWithCode { get; set; }Step 3.2. Modify the DoesPCEHRExist method in the Patient Appointment Form class (from the previous guide) which sets a Boolean flag if an Access Code is required.
if (response.PCEHRExists)
{
    btnMyHealthRecord.Enabled = true;
    if (response.accessCodeRequired.ToString() == "WithCode")
    {
        GainAccessWithCode = true;
    }
}
Step 3.3. In this step, we add a method to call the GainPCEHRAccess web service with and without an Access Code, while also creating an Emergency Access option. We will call this method on the My Health Record button click event.
private void MyHRGainAccess(string accessCode)
{

    // Obtain the certificate for use with TLS and signing
    X509Certificate2 cert = PCEHRHelper.GetCertificate();

    // Create PCEHR header
    CommonPcehrHeader header = PCEHRHelper.CreateHeader();
    header.IhiNumber = IHINumber;

    // Instantiate the client PCEHR Gain Access Testing endpoint.
    GainPCEHRAccessClient gainPcehrAccessClient = new GainPCEHRAccessClient(new Uri(ConfigurationManager.AppSettings.Get("GainPCEHRAccess")), cert, cert);

    // Add server certificate validation callback
    ServicePointManager.ServerCertificateValidationCallback += ValidateServiceCertificate;

    // Create the access request
    gainPCEHRAccessPCEHRRecord accessRequest = new gainPCEHRAccessPCEHRRecord();
    // if gaining access without a code, authorisationDetails is not required
    // if gaining access with a code, include authorisationDetails, accessCode and accessType
    // if gaining emergency access, include authorisationDetails and set accessType to “EmergencyAccess”
    // Only include the below to pass an access code or gain emergency access

    if (!string.IsNullOrEmpty(accessCode))
    {
        accessRequest.authorisationDetails = new gainPCEHRAccessPCEHRRecordAuthorisationDetails();
        accessRequest.authorisationDetails.accessCode = accessCode;
        accessRequest.authorisationDetails.accessType = gainPCEHRAccessPCEHRRecordAuthorisationDetailsAccessType.AccessCode;
    }

    if (EmergencyAccess)
    {
        accessRequest.authorisationDetails = new gainPCEHRAccessPCEHRRecordAuthorisationDetails();
        accessRequest.authorisationDetails.accessType = gainPCEHRAccessPCEHRRecordAuthorisationDetailsAccessType.EmergencyAccess;

        DialogResult dialogResult = MessageBox.Show("By selecting Emergency Access you are declaring that access to this My Health Record is necessary to lessen or prevent a serious threat to an individual’s life, health or safety, or to public health.", "Emergency Access", MessageBoxButtons.OKCancel, MessageBoxIcon.Warning);

        if (dialogResult == DialogResult.Cancel)
        {
            //do something else
            return;
        }
    }

    gainPCEHRAccessResponseIndividual individual = new gainPCEHRAccessResponseIndividual();

    try
    {
        // Invoke the service
        responseStatusType responseStatus = gainPcehrAccessClient.GainPCEHRAccess(header, accessRequest, out individual);
        // Get the soap request and response
        string soapRequest = gainPcehrAccessClient.SoapMessages.SoapRequest;
        string soapResponse = gainPcehrAccessClient.SoapMessages.SoapResponse;

        txtSOAPResponse.Text = soapResponse;
        txtSOAPHeader.Text = soapRequest;
        txtError.Text = "";

        if (responseStatus != null && responseStatus.code == "PCEHR_SUCCESS")
        {
            // My Health Record Landing Page.
            MyHealthRecordForm myHRForm = new MyHealthRecordForm();
            myHRForm.Show();
        }
        else
        {
            txtError.Text = responseStatus.description;
        }

    }
    catch (FaultException fex)
    {
        // Handle any errors
        txtError.Text = fex.Message;
    }
    catch (Exception ex)
    {
        txtError.Text = ex.Message;
    }
}
Step 3.4. Add the GainPCEHRAccess web service end point inside the App.Config file.
<add key="GainPCEHRAccess" value="https://services.svt.gw.myhealthrecord.gov.au/gainPCEHRAccess" />Step 3.5. Add the EmergencyAccess and IHI as class properties in the Patient Appointment Form class file and modify the constructor to assign IHI to class property.
public bool EmergencyAccess { get; set; } = false;
public string IHINumber { get; set; }
public PatientAppointmentForm(string ihiNumber)
{
InitializeComponent();
IHINumber = ihiNumber; // Use this IHI number to call GainPCEHRAccess web //service
DoesMyHealthRecordExist(ihiNumber);
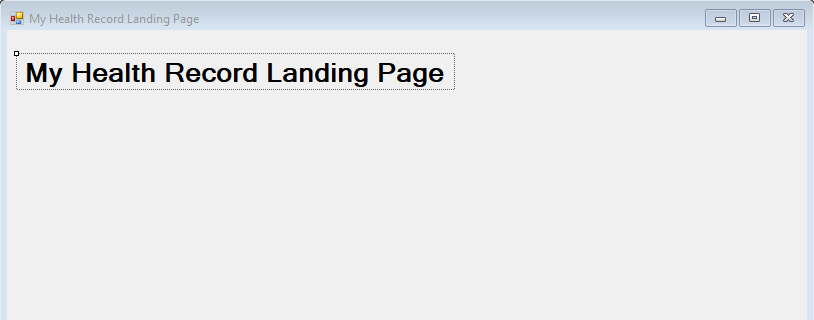
}Step 3.6. Add a new Windows form called MyHealthRecordForm which is opened once GainPCEHRAccess is granted successfully.
Step 3.7. Double click on My Health Record button on the Patient Appointment form and add the following code on the button click event. This code will open the My Health Record in most cases or display a prompt if a RAC is needed by the healthcare provider from the patient.
private void btnMyHealthRecord_Click(object sender, EventArgs e)
{

    if (GainAccessWithCode)
    {
       // Show dialog/prompt to user to enter access code and call gain access web         // service with access code entered by user or with emergency access option.

    }
    else
    {
        // Call GainPCEHRAccess Web service directly without access code.


    }
}
In the next step, we will create access prompt to enter access code and emergency access option.
Step 4: Access Code and Emergency Access prompt
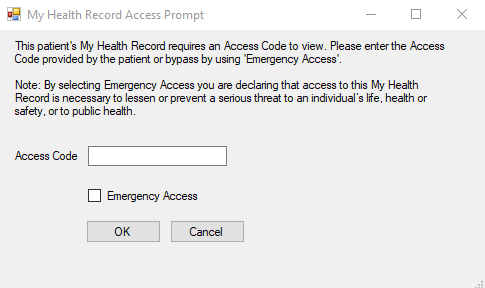
Step 4.1. Add a new Windows form called AccessPrompt and design the form as shown in the screenshot below. Rename the controls appropriately.
Step 4.2. Right click on the AccessPrompt form, click view code to add the following code in the class file.
public partial class AccessPrompt : Form
{
    public AccessPrompt()
    {
        InitializeComponent();
    }

    public string AccessCode
    {
        get { return txtAccessCode.Text; }
    }

    public bool EmergencyAccess
    {
        get { return chkEmergencyAccess.Checked; }
    }

}
Step 4.3. Add button click event code on OK and Cancel buttons as per the following steps.
a. Double click on the OK button and add the following code.
private void btnOk_Click(object sender, EventArgs e)
{
    if (string.IsNullOrEmpty(txtAccessCode.Text) && !chkEmergencyAccess.Checked)
    {
        MessageBox.Show("Please enter the patient's Access Code or use the Emergency Access option.");
    }

    this.DialogResult = DialogResult.OK;
    this.Close();

}
b. Double click on the Cancel button and add the following code.
private void btnCancel_Click(object sender, EventArgs e)
{
    this.Close();
}
Rename the controls as per your form design to remove compile errors.
Clarification
Step 4 above shows you how to create a dialog to enter an Access Code. It is up to the software developer to create a mechanism/screen where the user can enter an Access Code or select the Emergency Access option.
Step 5: Call the GainPCEHRAccess web service
Step 5.1. Modify the code inside the My Health Record button click event on the Patient Appointment form as per given code.
private void btnMyHealthRecord_Click(object sender, EventArgs e)
{
    if (GainAccessWithCode)
    {
        // Show dialog/prompt to user to enter access code and call gain access web service
        // with access code entered by user or with emergency access option.

        using (AccessPrompt accessInputForm = new AccessPrompt())
        {
            if (accessInputForm.ShowDialog() == DialogResult.OK)
            {
                string accessCode = accessInputForm.AccessCode;
                EmergencyAccess = accessInputForm.EmergencyAccess;
                MyHRGainAccess(accessCode);
            }
        }
    }
    else
    {
        // Call Gain Web service directly without access code.
        MyHRGainAccess(null);

    }
}
Step 6: Run and test application
In the following steps, we will test the GainPCEHRAccess web service with different scenarios. For example, with an Access Code, without an Access Code, an invalid Access Code and using the Emergency Access option.
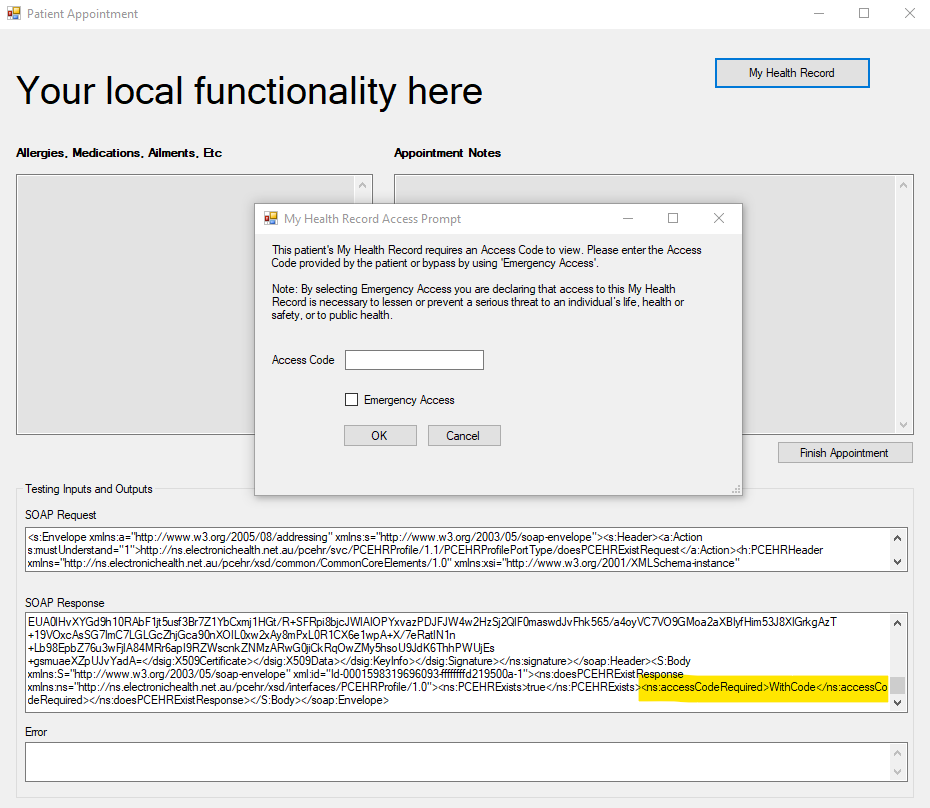
Step 6.1. See the output below when attempting to gain access to a My Health Record protected with an Access Code.
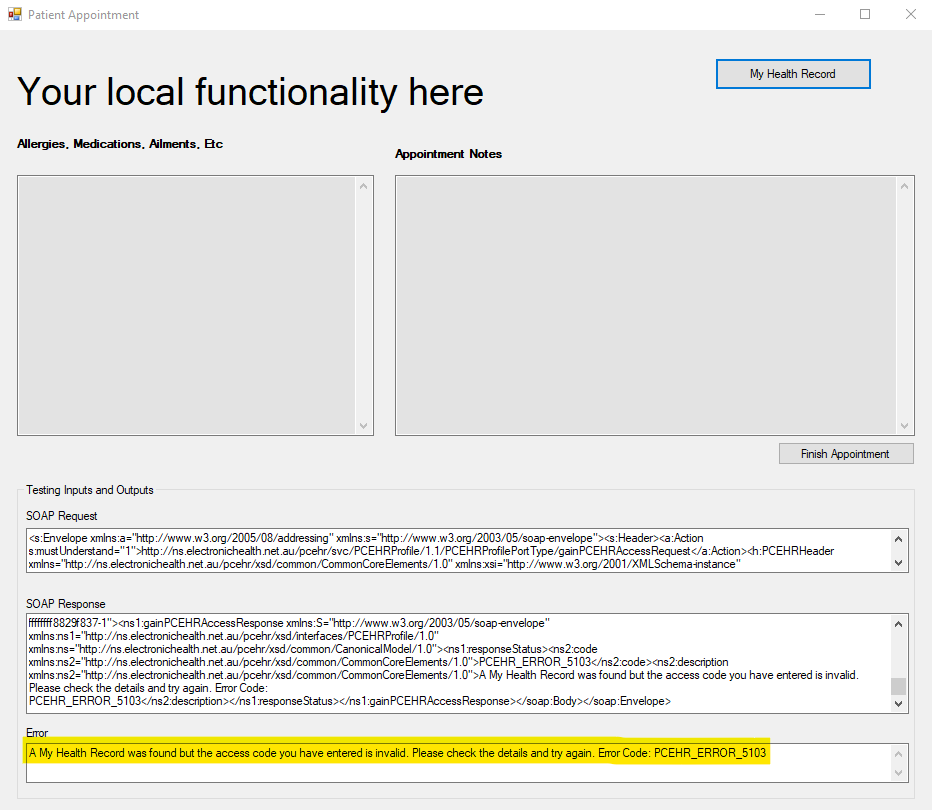
Step 6.2. Outputs when attempting to gain access to a My Health Record with an invalid Access Code.
More Information
The web service returns an error if there is an invalid request. For example, if patient access is protected with a Record Access Code but the request is sent without an Access Code, or if the IHI is invalid.
Important!
You will likely want to process error messages returned from the My Health Record system so that you can provide a better user experience to your users. The returned error messages are quite clear but they won’t provide advice specific to your users. A complete list of error messages can be found here [LINK] You should treat each error message individually and provide clear advice to your users on the purpose of each error message, the implications and potential solutions.
The following is a list of error messages specific to GainPCEHRAccess and are applicable alongside generic My Health Record error messages.
| PCEHR_ERROR_5101 | PCEHR not found |
| PCEHR_ERROR_5102 | PCEHR is found but access code is required |
| PCEHR_ERROR_5103 | PCEHR is found but access code is invalid |
| PCEHR_ERROR_5104 | You are not authorised to access this Record |
| PCEHR_ERROR_5001 | The family name contains invalid characters |
| PCEHR_ERROR_5002 | The birth year must not be before 1800 |
| PCEHR_ERROR_5003 | The date of birth must not be in the future |
| PCEHR_ERROR_5004 | Medicare card fails check digit routine |
| PCEHR_ERROR_5006 | No unique active IHI found |
| PCEHR_ERROR_5007 | IHI number fails the check digit routine |
| PCEHR_ERROR_5009 | Multiple search criteria keyed. Please refine the search criteria. |
| PCEHR_ERROR_5011 | The DVA file number entered is invalid |
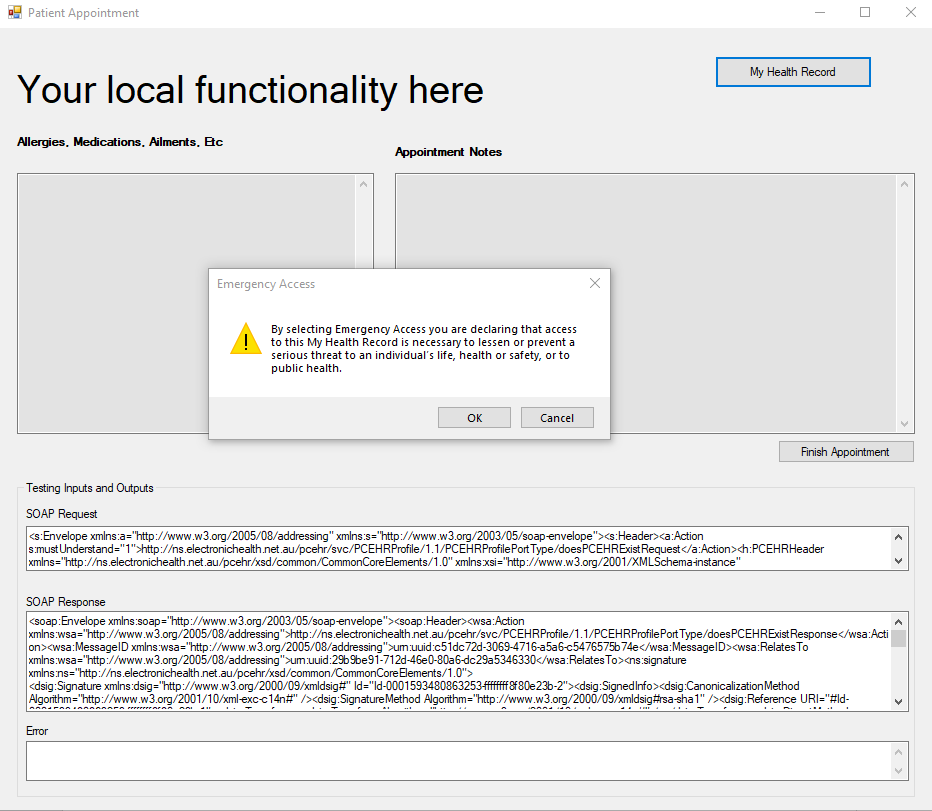
Step 6.3. An example of gaining access to a My Health Record using the Emergency Access option.
Step 7: Use Case UC.CIS.002.1
| Use Case Name | Gain access to PCEHR (with Access Code) |
| Purpose | To gain access to the healthcare recipient ‘s record in the PCEHR system using an Access Code. |
Clarification
The RAC and LDAC are referred to as PACC and PACCX respectively in the test cases below.
| Test Case ID | PCEHR_CIS_019048 |
|---|---|
| Objective | The clinical information system shall provide the CIS User with an option to enter provider access consent codes (PACC or PACCX) to make initial and subsequent requests to gain access to a PCEHR or protected clinical documents. |
| How to Evaluate | Request access to the PCEHR for a healthcare recipient whereby an access code must be entered to gain access to the record a. Verify that the software provides the facility to enter a PACC Code for that healthcare recipient's record. b. Verify that the software receives a successful response from the PCEHR System. Repeat the previous operation for the same subject: c. Verify that the software again provides the facility to enter PACCX Code for that healthcare recipient's record. d. Verify that the software receives a successful response from the PCEHR System. |
This test case simply explains that the CIS shall provide the facility to enter the Access Code for the patient’s My Health Record. The screenshot and code below demonstrate how your software can provide the user with an option to enter the Access Code while making the request to GainPCEHRAccess.
The following code demonstrates a My Health Record being accessed with an Access Code.
// Create the access request
gainPCEHRAccessPCEHRRecord accessRequest = new gainPCEHRAccessPCEHRRecord();

if (!string.IsNullOrEmpty(txtAccessCode.Text))
{
    accessRequest.authorisationDetails = new gainPCEHRAccessPCEHRRecordAuthorisationDetails();
    accessRequest.authorisationDetails.accessCode = txtAccessCode.Text;
    accessRequest.authorisationDetails.accessType = gainPCEHRAccessPCEHRRecordAuthorisationDetailsAccessType.AccessCode;
}


gainPCEHRAccessResponseIndividual individual = new gainPCEHRAccessResponseIndividual();

    // Invoke the service
responseStatusType responseStatus = gainPcehrAccessClient.GainPCEHRAccess(header, accessRequest, out individual);| Test Case ID | PCEHR_CIS_017941 |
|---|---|
| Objective | The Clinical Information System shall have a process to handle errors received from the PCEHR B2B Gateway Service. |
The My Health Record system returns error codes in the case of any errors. The following code example demonstrates how to handle the error: PCEHR_ERROR_5101. The description of this error message is as follows: A My Health Record was not found for this person. Error Code: PCEHR_ERROR_5101).
// Invoke the service
responseStatusType responseStatus = gainPcehrAccessClient.GainPCEHRAccess(header
    , accessRequest, out individual);

if(responseStatus.code == "PCEHR_ERROR_5101")
{
    // Do something
}
else if(responseStatus.code == "PCEHR_SUCCESS")
{
    // Do something else
}
Use Case UC.CIS.002.3
| Use Case Name | Gain access to PCEHR (Emergency Access) |
| Purpose | To demonstrate gaining (emergency) access to the healthcare recipient’s record in PCEHR system |
| Test Case ID | PCEHR_CIS_019116 |
|---|---|
| Objective | If the Clinical Information System supports gaining an emergency access to a healthcare recipient’s PCEHR, it shall display the conditions of emergency access at time intervals appropriate to the clinical settings before asserting emergency access to the PCEHR. |
| How to Evaluate | If the Clinical Information System supports gaining an emergency access to a healthcare recipient’s PCEHR: a. Request emergency access for a healthcare recipient whose record is protected by a PACC code and whose record has not been accessed before. b. Verify that the software displays the conditions of emergency access before access is asserted. |
The following code example demonstrates when a My Health Record is protected with a RAC and is accessed with Emergency Access, it notifies the user and displays the conditions of Emergency Access.
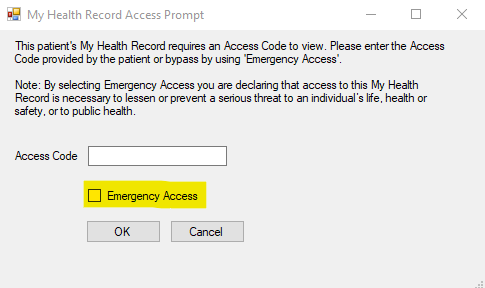
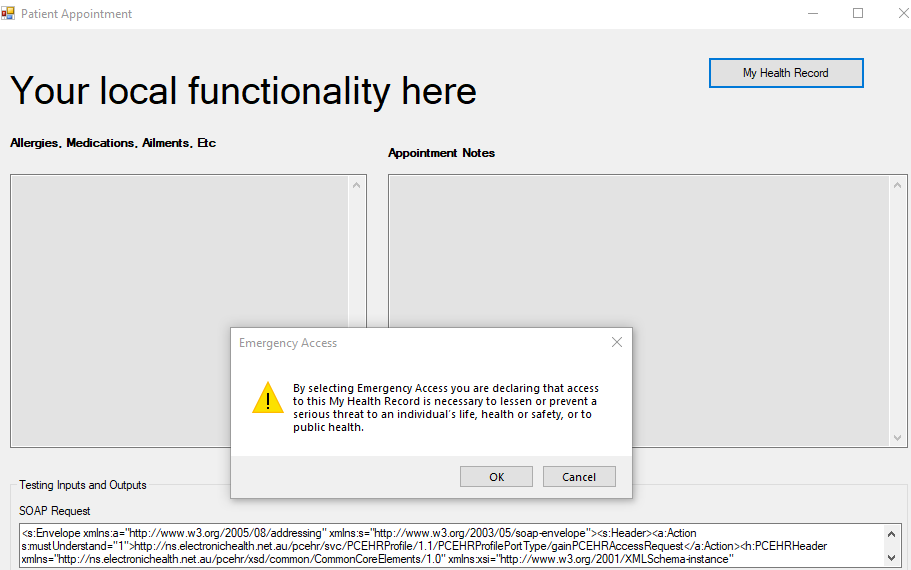
If the Emergency Access option is checked, the code below appends the Emergency Access option with the request.
if (EmergencyAccess)
{
    accessRequest.authorisationDetails = new gainPCEHRAccessPCEHRRecordAuthorisationDetails();
    accessRequest.authorisationDetails.accessType = gainPCEHRAccessPCEHRRecordAuthorisationDetailsAccessType.EmergencyAccess;

    DialogResult dialogResult = MessageBox.Show("By selecting Emergency Access you are declaring that access to this My Health Record is necessary to lessen or prevent a serious threat to an individual’s life, health or safety, or to public health.", "Emergency Access", MessageBoxButtons.OKCancel, MessageBoxIcon.Warning);

    if (dialogResult == DialogResult.Cancel)
    {
        //do something else
        return;
    }
}
Conclusion
In this guide we have thoroughly investigated the GainPCEHRAccess web service and looked at some UX implications. The next guide will continue from this point and explore more functionality of the My Health Record system. If you have any feedback about this guide, please contact us at help@digitalhealth.gov.au.
View All | Back | Next: Get Patient Document List and View Document - My Health Record B2B Developer Guide 3