Reading & Development: 2 hours
Quick Intro
This guide will use the My Health Record getView web service to download collated information from a My Health Record in a ‘View’. A view is simply a representation of data from a My Health Record which has been collated from multiple clinical documents. For example, a Prescription & Dispense View will allow you to display a summary of prescription and dispense information without your user opening many individual clinical documents. At the end of this walkthrough, you'll have a modified My Health Record Landing Page form that can make a web service call to download and display the Prescription & Dispense View, Medicare Overview, Diagnostic Imaging Report View, and the Pathology Report View using the patient’s IHI and dates fields.
More Information
Before calling the getView web service for a patient, GainPCEHRAccess must be called for that patient. Please see the previous My Health Record developer guides if you have not already conducted this step.
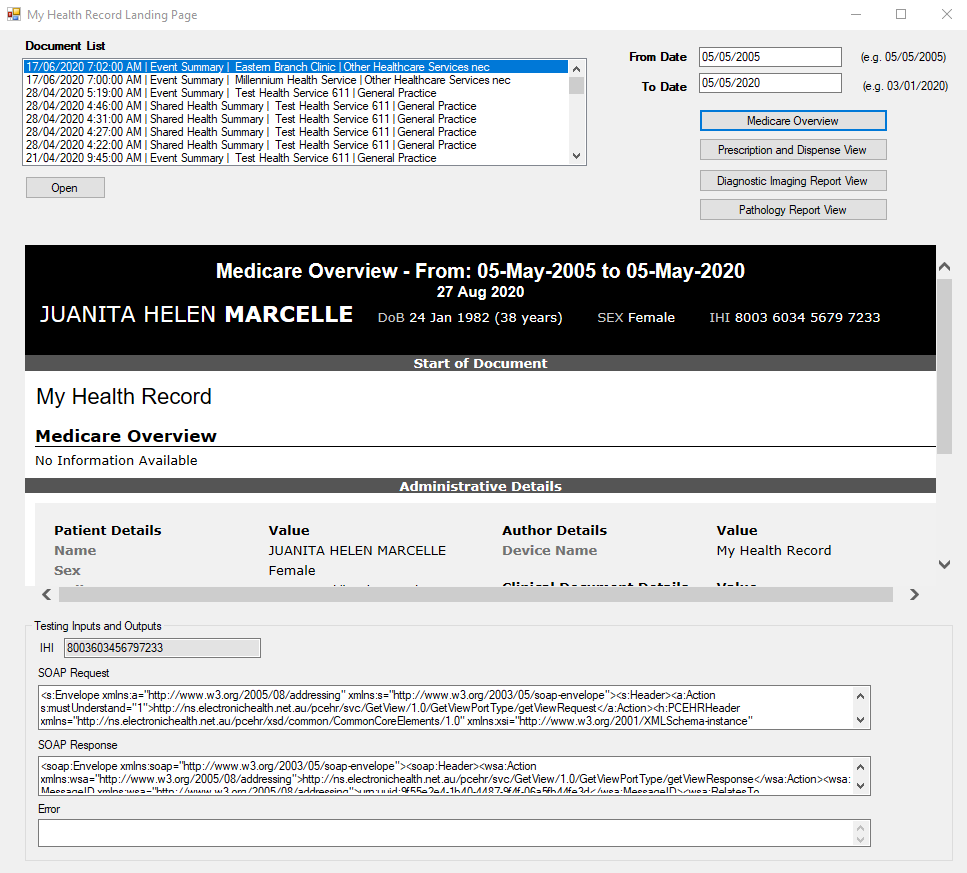
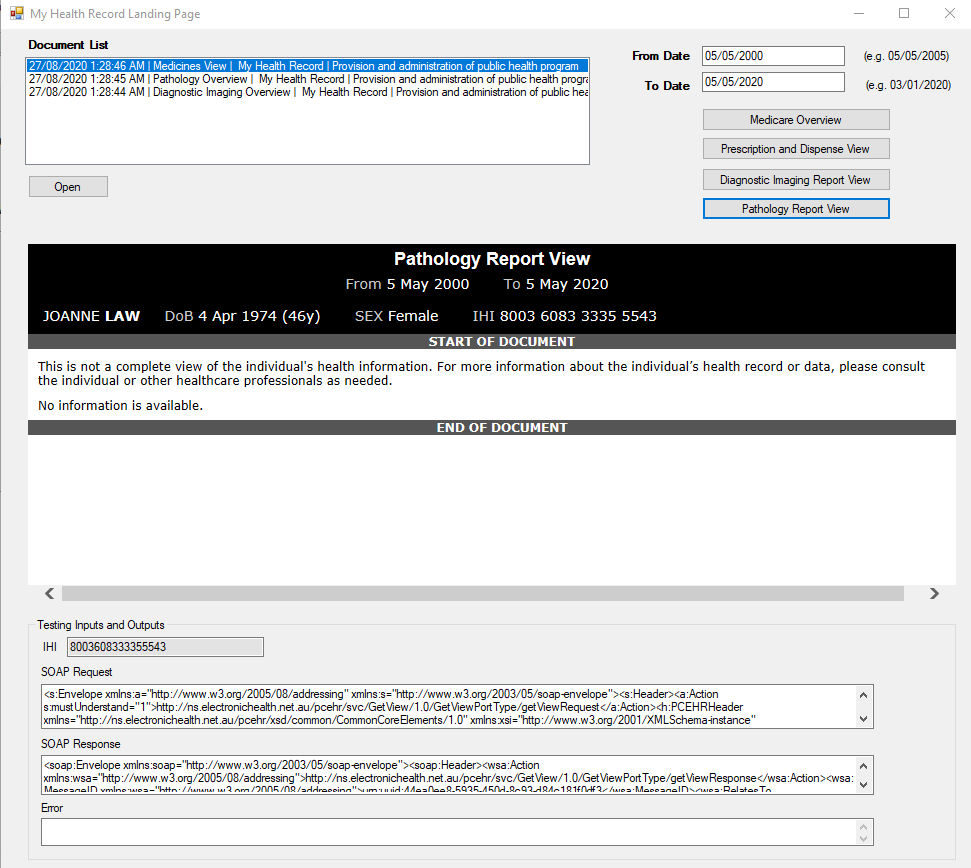
We will adapt our previously created My Health Record Landing Page to appear as per the screenshot below.
Step 1: Understand the 2 types of Views
The following points describe the 2 types of My health Record Views and the easiest way to render these to the user. Agency stylesheets can be found on GitHub.
1. CDA based Views. Which can be rendered using the CDA Stylesheet;
a. Prescription & Dispense View (Prescription and Dispense View stylesheet)
b. Medicare Overview (Generic Stylesheet)
c. Observation View (Generic Stylesheet)
d. Health Check Schedule View (Generic Stylesheet)
2. XML based Views. Which must be parsed and rendered to a native or HTML view;
a. Pathology Report View
b. Diagnostic Imaging Report View
c. Health Record Overview
Note
If you choose Pathology or Diagnostic Imaging Report documents in your getDocumentList, or if you do not include a filter, then you will receive a Pathology & Diagnostic Imaging Report View in CDA which should contain the same information as the first 2 XML based Views above.
In this guide we will only cover a subset of the Views listed above. All of these examples are similar. To check the full list of views, a sample demonstration application is available on GitHub link.
Step 2: Prepare your form for Views
1. Add text fields to capture a date range to and from. To easily demonstrate this functionality we have included individual buttons for each of the Views, although this would be considered poor usability for a production product.

2. Right click on the form and click view code to add the following additional namespaces.
using System.Configuration;
using Nehta.VendorLibrary.PCEHR.GetView;
using Nehta.VendorLibrary.PCEHR.MedicareOverview;
using Nehta.VendorLibrary.PCEHR.PrescriptionAndDispenseView;
using Nehta.VendorLibrary.PCEHR.DiagnosticImagingReportView;
using System.Xml.Serialization;
using Nehta.VendorLibrary.CDAPackage;
Step 3: Medicare Overview
The getView web service returns a response with the CDA package (zip file) that contains two XML files. In the next steps we will call the getView web service, retrieve the CDA package, extract the ZIP file locally, and load the document XML content with a generic stylesheet available on https://developer.digitalhealth.gov.au/resources/open-source-sample-code-directory-github-and-nuget.
1. Download the stylesheet from the https://developer.digitalhealth.gov.au/resources/open-source-sample-code-directory-github-and-nuget and save as an XSL file.
2. Add the web service endpoint inside the App.Config file
<add key="PatientViews" value="https://services.svt.gw.myhealthrecord.gov.au/getView" />3. Double click on the Medicare Overvew button, and add the following code on the button click event.
private void btnMedicareView_Click(object sender, EventArgs e)
{
    header.IhiNumber = IHINumber;
    // Instantiate the client
    GetViewClient getViewClient = new GetViewClient(
           new Uri(ConfigurationManager.AppSettings.Get("PatientViews")), cert, cert);

    // Add server certificate validation callback
    ServicePointManager.ServerCertificateValidationCallback += ValidateServiceCertificate;
    try
    {
        getView request = new getView()
        {
            // For MedicareOverview
            view = new medicareOverview()
            {
                fromDate = Convert.ToDateTime(txtFromDate.Text),
                toDate = Convert.ToDateTime(txtToDate.Text),
                // versionNumber can be found in the "PCEHR View Service - Technical Service Specification" via
                // https://developer.digitalhealth.gov.au/resources/my-health-record-b2b-gateway-services-v2-0
                // If the specification doesn't specify the version number then it is 1.0
                versionNumber = "1.0"
            }
        };

        var responseStatus = getViewClient.GetView(header, request);

        // Treat response like a getDocument - unzip package
        if (responseStatus.view != null)
        {
            string extractPath = @"C:\adha\views\extract\medicareOverview\";

            // Extract the contents of a CDA package file
            // Signature is verified on this call, with an exception thrown if the validation fails
            var newPackage = CDAPackageUtility.Extract(
            responseStatus.view.data,
            VerifyCertificate
            );

            // Get CDA document content
            byte[] cdaRoodDocumentContent = newPackage.CDADocumentRoot.FileContent;
            string rootDocumentFilePath = extractPath + newPackage.CDADocumentRoot.FileName;
            File.WriteAllBytes(rootDocumentFilePath, cdaRoodDocumentContent);

            // View the document
            if (File.Exists(rootDocumentFilePath))
            {
                string xslFile = @"C:\adha\views\DH_Generic_CDA_Stylesheet-x.y.z.xsl";

                XslCompiledTransform xslDocument = new XslCompiledTransform();
                xslDocument.Load(xslFile);
                StringWriter stringWriter = new StringWriter();
                XmlWriter xmlWriter = new XmlTextWriter(stringWriter);
                xslDocument.Transform(rootDocumentFilePath, xmlWriter);
                webBrowserView.DocumentText = stringWriter.ToString();
            }
        }
        // Get the soap request and response
        string soapRequest = getViewClient.SoapMessages.SoapRequest;
        string soapResponse = getViewClient.SoapMessages.SoapResponse;

        txtSOAPRequest.Text = soapRequest;
        txtSOAPResponse.Text = soapResponse;
    }
    catch (FaultException fex)
    {
        // Handle any errors
        txtError.Text = fex.Message;
    }
}
Note
We have already used Nehta.VendorLibrary.CDAPackage in the previous developer guide which used the CDAPackageUtility class to extract the CDA document.
4. Ensure the file paths are correct.
5. Run the application and test the Medicare Overview.
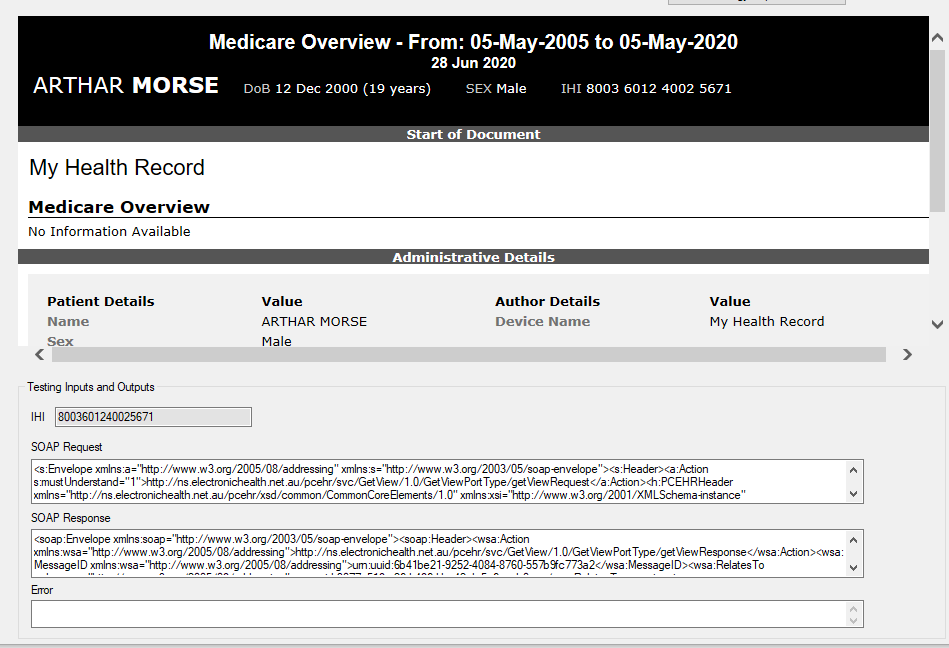
Step 4: Prescription & Dispense View
1. Download the Prescription & Dispense View stylesheet

2. Double click on Prescription & Dispense View button and add the following code inside the on click event method.
private void btnPrescriptionDispenseView_Click(object sender, EventArgs e)
{
    header.IhiNumber = IHINumber;

    // Instantiate the client
    GetViewClient getViewClient = new GetViewClient(new Uri(ConfigurationManager.AppSettings.Get("PatientViews")), cert, cert);

    // Add server certificate validation callback
    ServicePointManager.ServerCertificateValidationCallback += ValidateServiceCertificate;

    try
    {
        getView request = new getView()
        {
            // For PrescriptionAndDispenseView
            view = new prescriptionAndDispenseView()
            {
                fromDate = Convert.ToDateTime(txtFromDate.Text),
                toDate = Convert.ToDateTime(txtToDate.Text),

                // versionNumber can be found in the "PCEHR View Service - Technical Service Specification" via
                // https://developer.digitalhealth.gov.au/resources/my-health-record-b2b-gateway-services-v2-0
                // If the specification doesn't specify the version number then it is 1.0
                versionNumber = "1.0"
            }
        };

        var responseStatus = getViewClient.GetView(header, request);
        // Treat response like a getDocument - unzip package
        if (responseStatus.view != null)
        {
            string extractPath = @"C:\adha\views\extract\prescriptionAndDispenseView\";

            // Extract the contents of a CDA package file
            // Signature is verified on this call, with an exception thrown if the validation fails
            var newPackage = CDAPackageUtility.Extract(
            responseStatus.view.data,
            VerifyCertificate
            );

            // Get CDA document content
            byte[] cdaRoodDocumentContent = newPackage.CDADocumentRoot.FileContent;
            string rootDocumentFilePath = extractPath + newPackage.CDADocumentRoot.FileName;
            File.WriteAllBytes(rootDocumentFilePath, cdaRoodDocumentContent);

            // View the document
            if (File.Exists(rootDocumentFilePath))
            {
                string xslFile = @"C:\adha\views\NEHTA_PCEHR_Prescription_and_Dispense_View_CDA_Stylesheet-x.y.z.xsl";

                XslCompiledTransform xslDocument = new XslCompiledTransform();
                xslDocument.Load(xslFile);
                StringWriter stringWriter = new StringWriter();
                XmlWriter xmlWriter = new XmlTextWriter(stringWriter);
                xslDocument.Transform(rootDocumentFilePath, xmlWriter);
                webBrowserView.DocumentText = stringWriter.ToString();
            }
        }
        // Get the soap request and response
        string soapRequest = getViewClient.SoapMessages.SoapRequest;
        string soapResponse = getViewClient.SoapMessages.SoapResponse;
        txtSOAPRequest.Text = soapRequest;
        txtSOAPResponse.Text = soapResponse;
    }
    catch (FaultException fex)
    {
        // Handle any errors
        txtError.Text = fex.Message;
    }
}
5. Check the file paths are correct as per your local paths.
6.Run the application and test the Prescription and Dispense View.
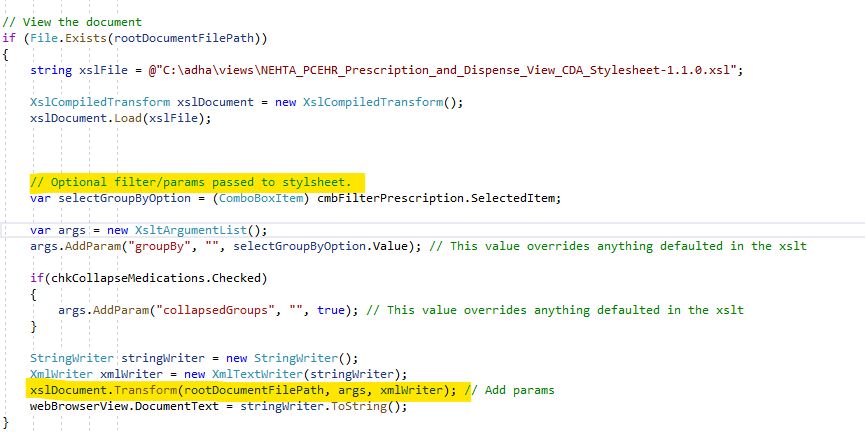
7. (Optional) We will now add filters which can be applied to the stylesheet. In this step we will explore the display options which are available inside the stylesheet to format the Prescription and Dispense View.
a. Add a combo box for Group By (e.g. prescription, generic brand, etc) and a check box labelled Collapse Medications as shown in the screenshot below

b. Add the following class to be used as Group By object values.
public class ComboBoxItem
{
    public string Text { get; set; }
    public object Value { get; set; }
    public override string ToString()
    {
        return Text;
    }
}
Note
Please note the names of the UI controls such as the combo box and the checkbox and update your code accordingly.
c. Add the following code into the MyHealthRecordForm form load event to add the Group By combo box items.
private void MyHealthRecordForm_Load(object sender, EventArgs e)
{
    cmbFilterPrescription.Items.AddRange(new ComboBoxItem[] {
        new ComboBoxItem {Text="Prescription", Value="prescription" },
        new ComboBoxItem {Text="Generic Name", Value="genericName" },
        new ComboBoxItem {Text="Brand Name", Value="brandName" },
        new ComboBoxItem {Text="PBS Item Code", Value="pbsItemCode" },
        new ComboBoxItem {Text="None", Value="none" },
    });
}
d. Next we will modify the Prescription and Dispense View button click event code to pass the selected filters into the stylesheet as parameters before rendering the View onto the browser control.
{
    string xslFile = @"C:\adha\views\NEHTA_PCEHR_Prescription_and_Dispense_View_CDA_Stylesheet-x.y.z.xsl";

    XslCompiledTransform xslDocument = new XslCompiledTransform();
    xslDocument.Load(xslFile);


    // Optional filter/params passed to stylsheet.
    var selectGroupByOption = (ComboBoxItem) cmbFilterPrescription.SelectedItem;
    var args = new XsltArgumentList();
    args.AddParam("groupBy", "", selectGroupByOption.Value); // This value overrides anything defaulted in the xslt

    if(chkCollapseMedications.Checked)
    {
        args.AddParam("collapsedGroups", "", true); // This value overrides anything defaulted in the xslt
    }

    StringWriter stringWriter = new StringWriter();
    XmlWriter xmlWriter = new XmlTextWriter(stringWriter);
    xslDocument.Transform(rootDocumentFilePath, args, xmlWriter); // Add params
    webBrowserView.DocumentText = stringWriter.ToString();
}
Modified Code Screenshot:
Step 5: Diagnostic Imaging Report View
1. Download the Diagnostic Imaging Report View stylesheet from the GitHub Link and save as XSL file.

2. Double click the Diagnostic Imaging Report View button and add the following on button click event.
private void btnDiagnosticImagingView_Click(object sender, EventArgs e)
{
    // Override this value to the current patient's IHI.
    header.IhiNumber = IHINumber;

    // Instantiate the client
    GetViewClient getViewClient = new GetViewClient(new Uri(ConfigurationManager.AppSettings.Get("PatientViews")), cert, cert);

    // Add server certificate validation callback
    ServicePointManager.ServerCertificateValidationCallback += ValidateServiceCertificate;
    try
    {
        getView request = new getView()
        {
            // Creates a diagnosticImagingReportView
            view = new diagnosticImagingReportView()
            {
                fromDate = Convert.ToDateTime(txtFromDate.Text),
                toDate = Convert.ToDateTime(txtToDate.Text),

                // versionNumber can be found in the "PCEHR View Service - Technical Service Specification" via
                // https://developer.digitalhealth.gov.au/resources/my-health-record-b2b-gateway-services-v2-0
                // If the specification doesn't specify the version number then it is 1.0
                versionNumber = "1.0"
            }

        };

        var responseStatus = getViewClient.GetView(header, request);

        // Convert XML response into Class for diagnosticImagingReportView
        XmlDocument xml = new XmlDocument();
        xml.PreserveWhitespace = true;
        xml.LoadXml(Encoding.Default.GetString(responseStatus.view.data));

        string xslFile = @"C:\adha\views\DH_Diagnostic_Imaging_And_Pathology_View_CDA_Stylesheet-1.1.1.xsl";

        XslCompiledTransform xslDocument = new XslCompiledTransform();
        xslDocument.Load(xslFile);

        StringWriter stringWriter = new StringWriter();
        XmlReader xmlReadB = new XmlTextReader(new StringReader(xml.DocumentElement.OuterXml));
        xslDocument.Transform(xmlReadB, null, stringWriter);
        webBrowserView.DocumentText = stringWriter.ToString();

        // XML document can be desearilized into object as blow.
        diagnosticImagingReportViewResponse data = new diagnosticImagingReportViewResponse();
        data = (diagnosticImagingReportViewResponse)DeserialiseElementToClass(xml.DocumentElement, data);

        // Get the soap request and response
        string soapRequest = getViewClient.SoapMessages.SoapRequest;
        string soapResponse = getViewClient.SoapMessages.SoapResponse;
        txtSOAPRequest.Text = soapRequest;
        txtSOAPResponse.Text = soapResponse;
    }
    catch (FaultException fex)
    {
        // Handle any errors
        txtError.Text = fex.Message;
    }
}
To deserialize the element into a class, following additional code can be used.
diagnosticImagingReportViewResponse data = new diagnosticImagingReportViewResponse();
data = (diagnosticImagingReportViewResponse)DeserialiseElementToClass(xml.DocumentElement, data);
private static object DeserialiseElementToClass(XmlElement element, object doctype)
{
XmlDocument doc = new XmlDocument();
doc.AppendChild(doc.ImportNode(element, true));
XmlReader read = doc.CreateNavigator().ReadSubtree();
XmlRootAttribute rootAttr = new XmlRootAttribute(element.LocalName);
rootAttr.Namespace = element.NamespaceURI;
XmlSerializer xs = new XmlSerializer(doctype.GetType(), rootAttr);
object rv = xs.Deserialize(read);
return (rv);
}3. Passing the Group By paramater (Optional). As per the Prescription and Dispense View example, we can pass a Group By parameter to the stylesheet before rendering on the browser control using the code below.
var responseStatus = getViewClient.GetView(header, request);

// Convert XML response into Class for diagnosticImagingReportView
XmlDocument xml = new XmlDocument();
xml.PreserveWhitespace = true;
xml.LoadXml(Encoding.Default.GetString(responseStatus.view.data));

string xslFile = @"C:\adha\views\DH_Diagnostic_Imaging_And_Pathology_View_CDA_Stylesheet-1.1.1.xsl";

XslCompiledTransform xslDocument = new XslCompiledTransform();
xslDocument.Load(xslFile);

var args = new XsltArgumentList();
args.AddParam("groupBy", "", "organisation"); // This value overrides anything defaulted in the xslt

StringWriter stringWriter = new StringWriter();
XmlReader xmlReadB = new XmlTextReader(new StringReader(xml.DocumentElement.OuterXml));
xslDocument.Transform(xmlReadB, args, stringWriter);
webBrowserView.DocumentText = stringWriter.ToString();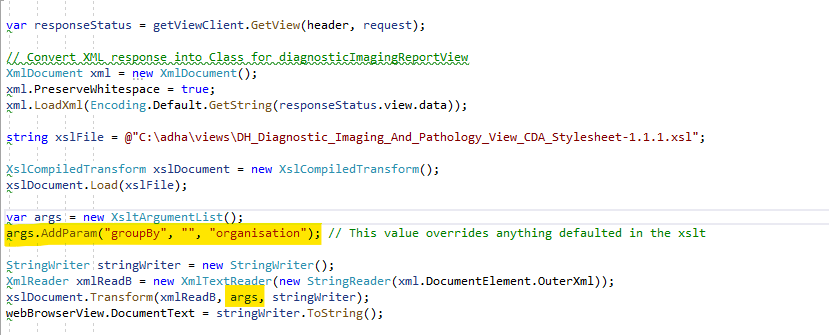
When you run and test the Diagnostic and Imaging View, it will display with the Group By as Organization.

Step 6: Pathology Report View
It is useful to note that you are not required to use Agency stylesheets to render the clinical documents, although our examples use this method.
1. Add the following code to import namespace related to pathology report view.
using Nehta.VendorLibrary.PCEHR.PathologyReportView;2. Double click the Pathology Report View button and add the following code on button click event.
private void btnPathologyView_Click(object sender, EventArgs e)
{
           // Override this value to the current patient's IHI.
            header.IhiNumber = IHINumber;

            // Instantiate the client
            GetViewClient getViewClient = new GetViewClient(new Uri(ConfigurationManager.AppSettings.Get("PatientViews")), cert, cert);

            // Add server certificate validation callback
            ServicePointManager.ServerCertificateValidationCallback += ValidateServiceCertificate;

            try
            {
                getView request = new getView()
                {
                    // Creates a pathologyReportView
                    view = new pathologyReportView()
                    {
                        fromDate = Convert.ToDateTime(txtFromDate.Text),
                        toDate = Convert.ToDateTime(txtToDate.Text),
                        // versionNumber can be found in the "PCEHR View Service - Technical Service Specification" via
                        // https://developer.digitalhealth.gov.au/resources/my-health-record-b2b-gateway-services-v2-0
                        // If the specification doesn't specify the version number then it is 1.0
                        versionNumber = "1.0"
                    }
                };

                var responseStatus = getViewClient.GetView(header, request);

                // Convert XML response into Class for pathologyReportView
                XmlDocument xml = new XmlDocument();
                xml.PreserveWhitespace = true;
                xml.LoadXml(Encoding.Default.GetString(responseStatus.view.data));

                string xslFile = @"C:\adha\views\DH_Diagnostic_Imaging_And_Pathology_View_CDA_Stylesheet-1.1.1.xsl";
                XslCompiledTransform xslDocument = new XslCompiledTransform();
                xslDocument.Load(xslFile);
                StringWriter stringWriter = new StringWriter();
                XmlReader xmlReadB = new XmlTextReader(new StringReader(xml.DocumentElement.OuterXml));
                xslDocument.Transform(xmlReadB, null, stringWriter);
                webBrowserView.DocumentText = stringWriter.ToString();

                //pathologyReportViewResponse data = new pathologyReportViewResponse();
                //data = (pathologyReportViewResponse)DeserialiseElementToClass(xml.DocumentElement, data);

                // Get the soap request and response
                string soapRequest = getViewClient.SoapMessages.SoapRequest;
                string soapResponse = getViewClient.SoapMessages.SoapResponse;
                txtSOAPRequest.Text = soapRequest;
                txtSOAPResponse.Text = soapResponse;
            }
            catch (FaultException fex)
            {
                // Handle any errors
                txtError.Text = fex.Message;
            }
}
2. Run the application and test Pathology View.
Conclusion
In this guide we have implemented the getView web service. The next guide will continue from this point and explore more functionality of the My Health Record system.
If you have any feedback about this guide, please contact us at help@digitalhealth.gov.au.
View All | Back | Next: Upload Document - My Health Record B2B Developer Guide 5