Reading & Development: 1-2 hours
Quick Intro
This guide describes the steps to supersede a Clinical Document in the My Health Record system. The ability to supersede a document is a requirement of uploading (unless your software only uploads Shared Health Summaries). For example if one of your users become aware that they have uploaded some incorrect clinical information then they would likely use the supersede (or remove) functionality. Superseding a document uses similar code to uploadDocument. Our example below will use the existing UploadDocuments form created in the previous guide.
In this example, you will;
- Supersede a clinical document
- Verify some code against My Health Record Conformance use cases.
Step 1: Prepare the UI and code
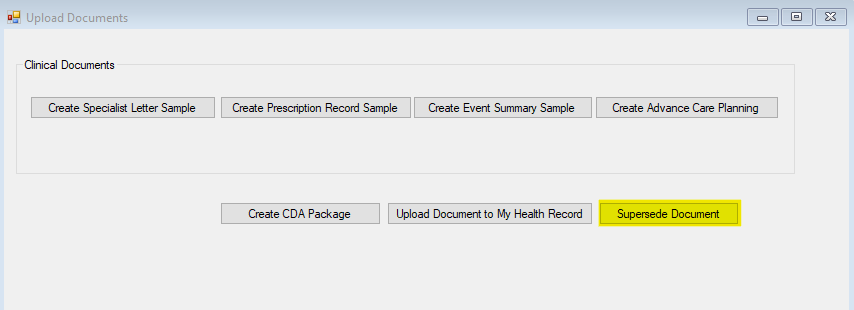
1. Add a button called Supersede Document on the UploadDocuments form created in the previous guide.
2. Double click on the Supersede Document button and add the following code on the button click event. Note that to supersede an existing Clinical Document, the new Clinical Document must have a different OID/UUID/GUID to the one it is replacing. We will be replacing several values in this code.
private void btnSupersedeDocument_Click(object sender, EventArgs e)
{
    // Override this value to the current patient's IHI.
    header.IhiNumber = "800360866670XXXX";

    // Create the client
    UploadDocumentClient uploadDocumentClient = new UploadDocumentClient(
        new Uri("https://services.svt.gw.myhealthrecord.gov.au/uploadDocument"), cert, cert);

    // Add server certificate validation callback
    ServicePointManager.ServerCertificateValidationCallback += ValidateServiceCertificate;

    byte[] packageBytes = File.ReadAllBytes(@"C:\adha\cda\upload\CdaPackageOutputFilePath.zip"); // Create a package

    ProvideAndRegisterDocumentSetRequestType request = uploadDocumentClient.CreateRequestForReplacement(
        packageBytes,
        "formatCode",
        "formatCodeName",
        HealthcareFacilityTypeCodes.GeneralPractice,
        PracticeSettingTypes.GeneralPracticeMedicalClinicService,
        "uuidOfDocumentToReplace" //this parameter is not required in the original upload. This is set to the document ID of the document to be superseded/replaced.
        );

    try
    {
        // Invoke the service
        RegistryResponseType registryResponse = uploadDocumentClient.UploadDocument(header, request);

        // Get the soap request and response
        string soapRequest = uploadDocumentClient.SoapMessages.SoapRequest;
        string soapResponse = uploadDocumentClient.SoapMessages.SoapResponse;
    }
    catch (FaultException fex)
    {
        // Handle any errors
    }
}
Step 2: Update the code
1. Provide the correct IHI number in header for whom document is replaced.
// Override this value to the current patient's IHI.
header.IhiNumber = "800360866670XXXX";
2. Create an amended version of Clinical Document and generate a CDA Package for it. You will need the file path of the new Clinical Document which will be uploaded to the My Health Record system to replace an existing Clinical Document.
byte[] packageBytes = File.ReadAllBytes(
        @"C:\adha\cda\upload\CdaPackageOutputFilePath.zip");
3. Replace formatCode, formatCodeName and uuidOfDocumentToReplace.
a. Note that the correct formatCode must be used. For example, to replace Prescription Record, Prescription Record Letter 3A - 1.2.36.1.2001.1006.1.170.5
b. uuidOfDocumentToReplace is the document id of the document being replaced. This could be an UUID or an OID. It might have been stored in your database, or it can be found using the getDocumentList web service. This process has already been covered in a previous guide.
ProvideAndRegisterDocumentSetRequestType request = uploadDocumentClient
.CreateRequestForReplacement(
packageBytes,
"formatCode",
"formatCodeName",
HealthcareFacilityTypeCodes.GeneralPractice,
PracticeSettingTypes.GeneralPracticeMedicalClinicService,
"uuidOfDocumentToReplace"
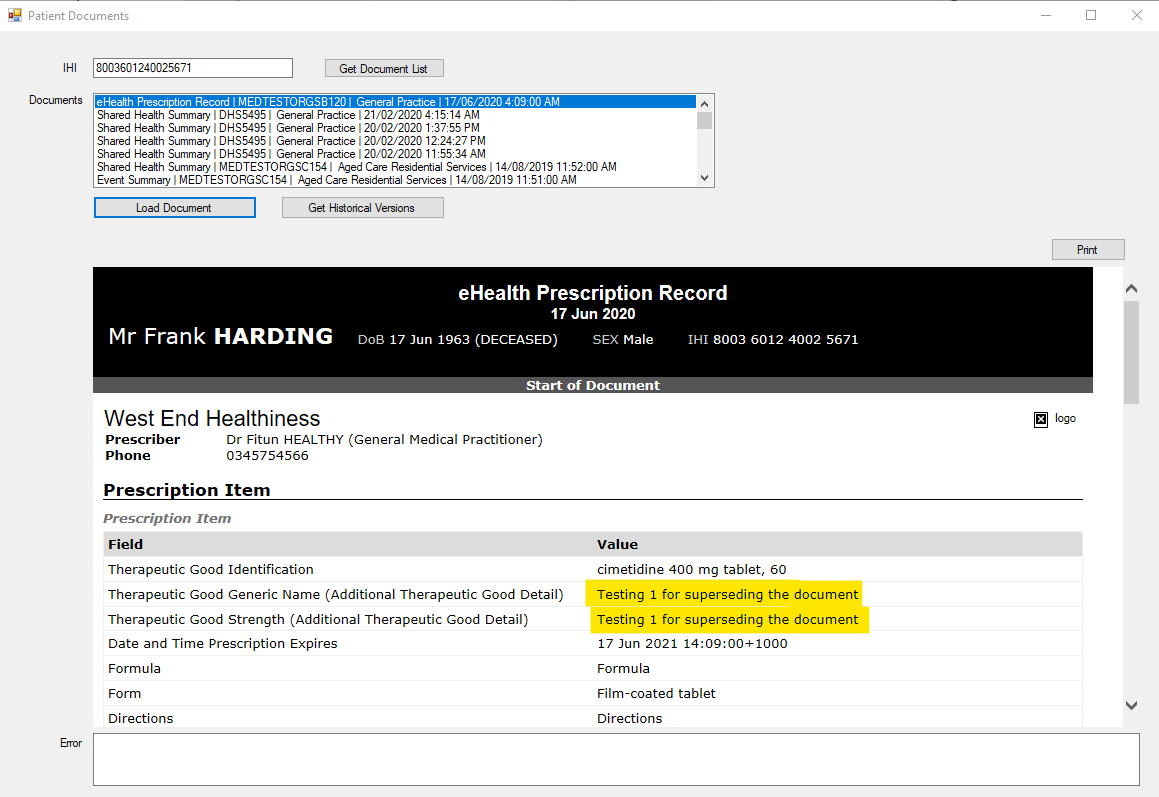
);Creating a Clinical Document is already covered in the previous developer guide. When creating a document, it gets new UUID/GUID. For the purpose of testing we will modify a prescriptionItem to verify if the supersedeDocument is successful. Inside the PopulatePrescriptionRecord, modify the content of the CreatePrescriptionItem method. For example TherapeuticGoodStrength as show in the code below.
Important
Note that when replacing a CDA Document you should make the SetId equal to the SetId of the document being replaced to identify that they are part of the same set. I.e. cdaContext.SetId = <DocumentBeingReplaced.CDAContext.SetId;>
internal static IPCEHRPrescriptionItem CreatePrescriptionItem(Boolean mandatorySectionsOnly, string prescriptionId)
{
    var prescriptionItem = PCEHRPrescriptionRecord.CreatePrescriptionItem();

    // The Dispensing Information Object
    prescriptionItem.DispensingInformation = CreateDispensingInformation(mandatorySectionsOnly);

    // Prescription Item Identifier - A globally unique object identifier for each instance of a Medication Instruction
    prescriptionItem.PrescriptionItemIdentifier = BaseCDAModel.CreateIdentifier("1.2.36.1.2001.1005.36", BaseCDAModel.CreateGuid());

    if (!mandatorySectionsOnly)
    {
        // Therapeutic Good Identification - The medicine, vaccine or other therapeutic good being ordered, administered to or used by the subject of care
        prescriptionItem.TherapeuticGoodId = BaseCDAModel.CreateCodableText("01158Y", CodingSystem.PBSCode, "cimetidine 400 mg tablet, 60", null, null);

        // Therapeutic Good Strength (Additional Therapeutic Good Detail) - Information concerning the strength of the Therapeutic Good
        prescriptionItem.TherapeuticGoodStrength = "Testing 1 for superseding the document";

        // Therapeutic Good Generic Name (Additional Therapeutic Good Detail) - The generic name of the Therapeutic Good
        prescriptionItem.TherapeuticGoodGenericName = "Testing 1 for superseding the document";

        // Directions - A complete narrative description of how much, when and how to use the medicine, vaccine or other therapeutic good
        prescriptionItem.Directions = "Directions";

        // Formula - The recipe for compounding a medicine
        prescriptionItem.Formula = "Formula";
}
5. Once all values are replaced correctly, run the application and create a new Prescription Record, generate the CDA Package and click the Supersede Document button. If the Clinical Document is superseded correctly it will return the following SOAP response with the success message. Note that the <soap:Header> has been removed for readability.
<?xml version="1.0"?>
<soap:Envelope xmlns:soap="http://www.w3.org/2003/05/soap-envelope">
<soap:Header></soap:Header><soap:Body xml:id="Id-0001592366959996-ffffffff9cad624b-1">
<rs:RegistryResponse status="urn:oasis:names:tc:ebxml-regrep:ResponseStatusType:Success" xmlns:rs="urn:oasis:names:tc:ebxml-regrep:xsd:rs:3.0" xmlns:env="http://www.w3.org/2003/05/soap-envelope"/>
</soap:Body>
</soap:Envelope>
The following screenshot shows the amended document that we have superseded.
Step 3: Use Case 202 (UC.CIS.202)
| Test Case ID | PCEHR_CIS_018338 |
|---|---|
| Objective | If the Clinical Information System supports the upload of documents other than Shared Health Summary, the Clinical Information System shall provide an ability to supersede previously uploaded clinical documents where there is a change or an error in the data used to create the uploaded clinical documents. |
| How to evaluate | If the software supports the uploading of clinical document types other than Shared Health Summary, create a clinical document other than Shared Health Summary for a healthcare recipient using the software, and perform the following steps: 1. Upload the document to the PCEHR System. 2. Create an amended version of the uploaded document. 3. Supersede the uploaded version on the PCEHR System with the amended version. Now: a. Verify that steps 1 - 3 above can be performed without error. |
This is a very straight forward test case which identifies the requirement for the supersede functionality.
Conclusion
In this guide we have learned how to supersede a Clinical Document. The next guide will continue from this point and show you how to remove a Clinical Document which was uploaded by the same provider organisation.
If you have any feedback about this guide, please contact us at help@digitalhealth.gov.au.
View All | Back | Next: Remove Document - My Health Record B2B Developer Guide 7