Reading & Development: 4-6 hours
Overview
This guide outlines the steps for creating and uploading clinical documents. Once you are registered with My Health Record, complete the following steps to upload clinical documents.
- Create the clinical document (such as Specialist letter, Event Summary, etc)
- Generate a CDA package which will contain the clinical document
- Upload the CDA package to the My Health Record system
- Understand the test cases from the conformance test specifications
Note
Uploading documents to My Health Record for a patient system does not require Gain Access.
Important
This guide will show you how to generate a clinical document. The Australian Digital Health Agency (the Agency) offers a Clinical Package Validator tool to run some validation tests on your CDA Package. You should familiarise yourself with this tool as you progress through this page.
At the end of this walkthrough, you'll have a windows form with the series of buttons required to complete each step in uploading clinical documents. Within your final product these steps will likely all be done together and (depending on your target sector) it is often recommended to include the generation and upload of a document as part of an existing workflow (i.e. the end of an appointment) as opposed to some separate button or menu option.
Step 1: Prepare prerequisites for UploadDocument
Step 1.1. Add a new Windows forms called UploadDocuments inside the same project that was created in the previous guides.
Step 1.2. Right click on the newly created UploadDocuments, click view code and add the following namespaces and code.
using System.IO;
using System.Net;
using System.Net.Security;
using System.Security.Cryptography.X509Certificates;
using Nehta.VendorLibrary.PCEHR;
using System.ServiceModel;
using Nehta.VendorLibrary.PCEHR.DocumentRepository;
Step 1.3. Add the following in the class to load your certificate and header information from your helper class.
// Obtain the certificate for use with TLS and signing
X509Certificate2 cert = PCEHRHelper.GetCertificate();

// Create PCEHR header
CommonPcehrHeader header = PCEHRHelper.CreateHeader();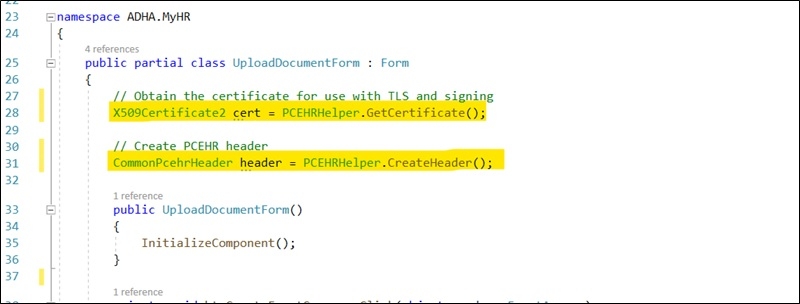
Step 1.4. Open the Visual Studio Package Manager Console and copy the following command. Hit enter to install the required libraries.
Install-Package Nehta.VendorLibrary.CDA.Generator.v3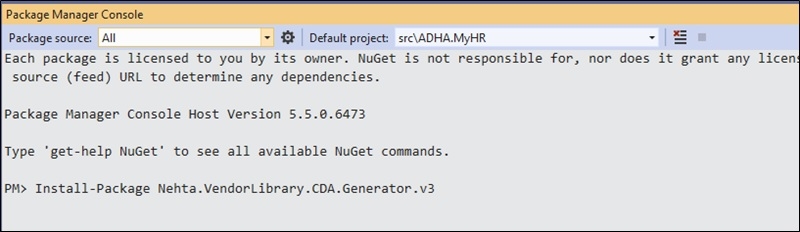
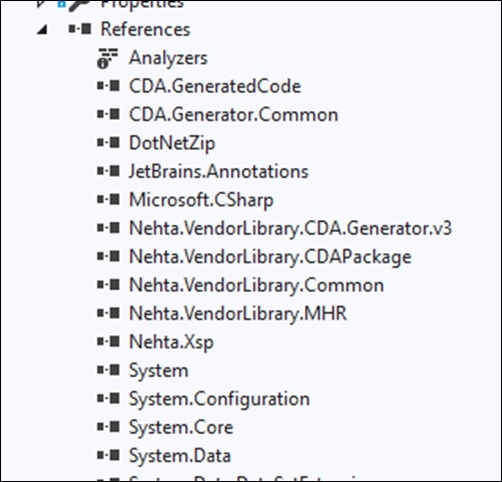
Once installed successfully, check the project references to ensure that Nehta.VendorLibrary.CDA.Generator.v3 is installed correctly.
Step 2: Generating a Specialist Letter
The first step of uploading a clinical document is to generate the clinical document. In this section we look into sample code available on GitHub to generate a Specialist Letter.
Step 2.1. Add a new class called SpecialistLetterSample.cs into the project.
using System;
using System.Collections.Generic;
using System.Linq;
using System.Text;
using System.Threading.Tasks;

// namespace can be different based on project structure.
namespace ADHA.MyHR.ClinicalDocuments
{
    public class SpecialistLetterSample
    {
    }
}
Step 2.2. Copy the sample code from Specialist Letter Sample GitHub link and paste it into the class. Make sure the namespace of your class is not changed as it is different in the sample code. Add the additional namespace which is not in the sample code.
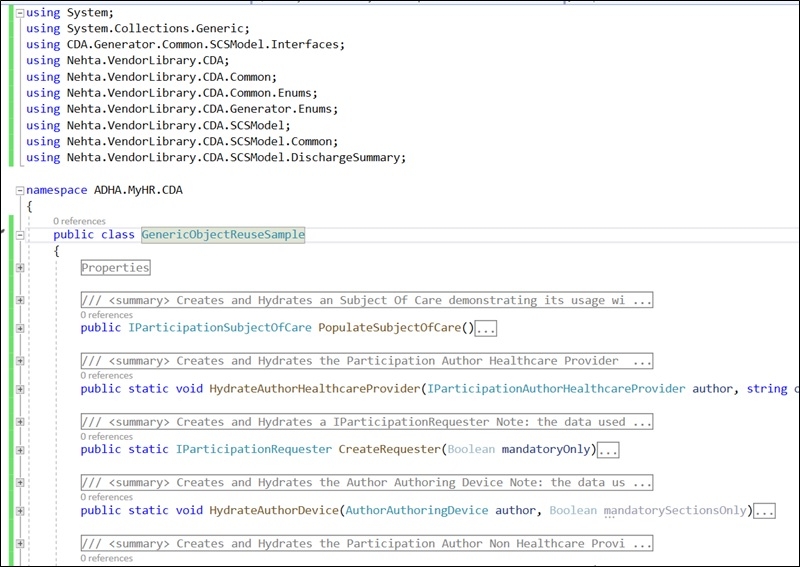
using Nehta.VendorLibrary.CDA;Step 2.3. Create a new class called GenericObjectReuseSample and copy the code from this GitHub Link, and paste it into the class. Make sure the namespace of your class is not changed as it is different in the sample code. Check that the following namespaces have been added correctly.
using Nehta.VendorLibrary.CDA;
using Nehta.VendorLibrary.CDA.Common;
using Nehta.VendorLibrary.CDA.Common.Enums;
using Nehta.VendorLibrary.CDA.Generator.Enums;
using Nehta.VendorLibrary.CDA.SCSModel;
using Nehta.VendorLibrary.CDA.SCSModel.Common;
using Nehta.VendorLibrary.CDA.SCSModel.Common.Entities;
using Nehta.VendorLibrary.CDA.SCSModel.DischargeSummary;
using Nehta.VendorLibrary.Common;
using PathologyTestResult = Nehta.VendorLibrary.CDA.SCSModel.Common.PathologyTestResult;
Step 2.4. Ensure the project can compile by checking the library packages installed and missing namespaces.
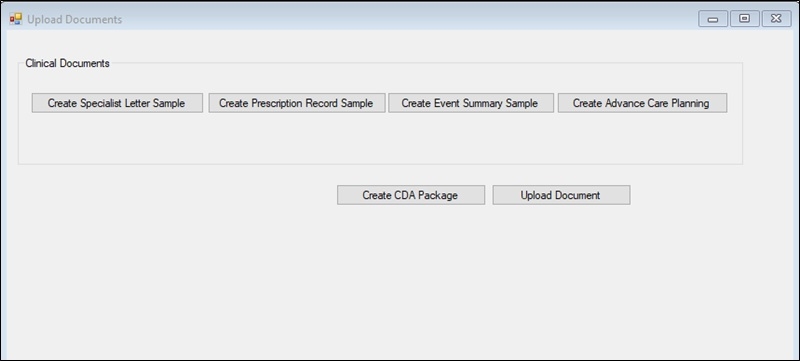
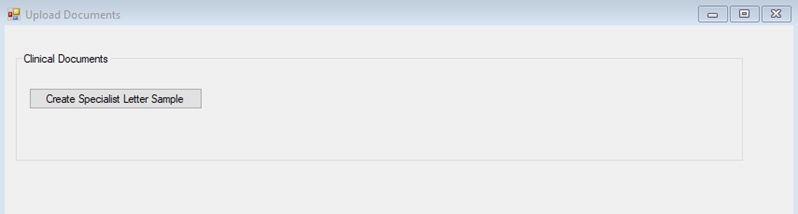
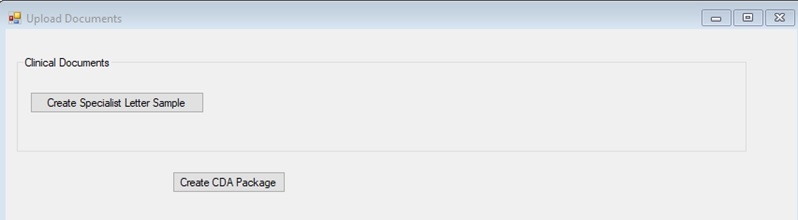
Step 2.5. Add a button on the UploadDocuments form to generate the Specialist Letter as shown in the screenshot.
Step 2.6. Double click on the Create Specialist Letter Sample button and add the following code on button click event.
private void btnGenerateSpecialistLetter_Click(object sender, EventArgs e)
{
var specialistLetterSampleCode = new SpecialistLetterSample();
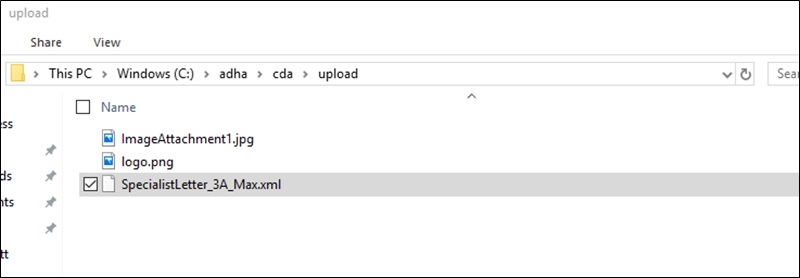
SpecialistLetterSample.OutputFolderPath = @"C:\adha\cda\upload";
var maxSpecialistLetterCda = specialistLetterSampleCode.MaxPopulatedSpecialistLetterSample("SpecialistLetter_3A_Max.xml");
}The SpecialistLetterSample class contains sample methods to generate a Specialist Letter filled with sample data, however, there is some information that needs to be replaced such as organisation, provider, and the health recipient’s IHI. For this example we will use the provided sample data. In your final product the patient context will be obvious based on the existing search, UI and workflow.
Step 3: Replace the required data for Specialist Letter
Inside the MaxPopulatedSpecialistLetterSample method, open the method PopulateSpecialistLetter. This method populates custodian, authenticator, author, and subject of care using the GenericObjectReuseSample class. Each of these values will be replaced. The document upload will return an error if there is a mismatch between identifiers.
You need to replace three sets of data values inside the PopulateSpecialistLetter method. First is the CDA Context model, and the second and third are the SCS Context and Content model. Use test data provided by Services Australia for testing.
CDA Context model
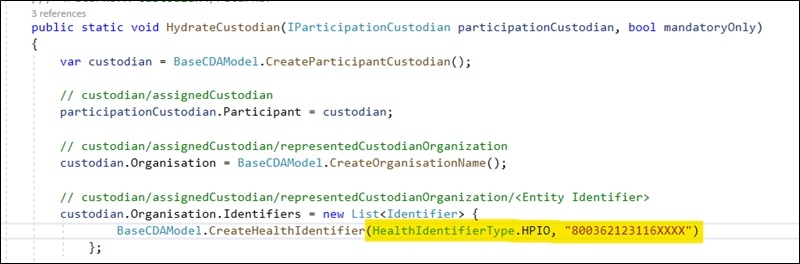
1. Update HydrateCustodian to load the HPI-O of the organisation using your software.
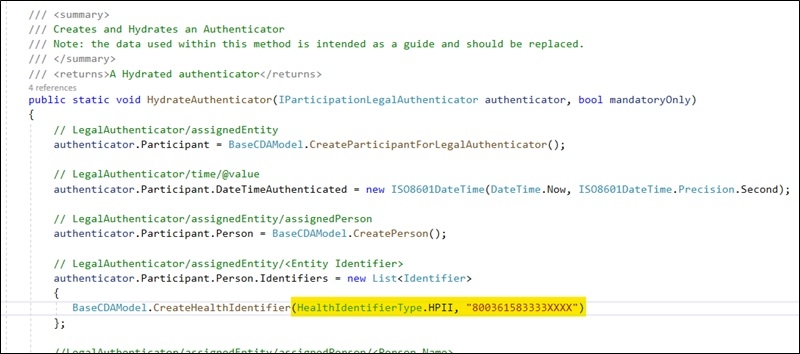
2. Update HydrateAuthenticator to load the HPI-I and HPI-O of the document uploader.
SCS Context Model
1. Update the HydrateAuthor method as follows.
2. Update the HydrateSubjectOfCare method as follows.
SCS Content model
This is the actual clinical information which would likely be entered by the healthcare provider which your system could then prepopulate into the Clinical Document. In the sample code, the CDA Content model is already populated with some sample data, and we can use that data to generate your first Specialist Letter.
Inside the PopulateSpecialistLetter method you will find the method calls which load the clinical information. To change the content you will navigate into the methods and load clinical content from your local data model.
For example, the following code changes AdverseReactions data by hardcoding a different SNOMED-CT AU Adverse Reaction. Your product would obviously not be hardcoding specific entries.
More Information
For more information about Clinical Terminology such as SNOMED-CT AU, please see our Clinical Terminology resources.
#region Setup and populate the SCS Content model

specialistLetter.SCSContent = SpecialistLetter.CreateSCSContent();

// Response details
specialistLetter.SCSContent.ResponseDetails = CreateResponseDetails(mandatorySectionsOnly);

// Recommendations
specialistLetter.SCSContent.Recommendations = CreateRecommendations(mandatorySectionsOnly);

// Medications
specialistLetter.SCSContent.Medications = CreateMedications(mandatorySectionsOnly);

if (!mandatorySectionsOnly)
{
    // Adverse reactions
    specialistLetter.SCSContent.AdverseReactions = CreateAdverseReactions();

    // Diagnostic Investigations
    specialistLetter.SCSContent.DiagnosticInvestigations = CreateDiagnosticInvestigations(mandatorySectionsOnly);
}

#endregion
private static IAdverseReactionsWithoutExclusions CreateAdverseReactions()
{
var reactions = SpecialistLetter.CreateAdverseReactionsWithoutExclusions();
reactions.AdverseSubstanceReaction = new List<Reaction>
{
CreateAdverseReaction(BaseCDAModel.CreateCodableText("86461001", CodingSystem.SNOMED, "Plant diterpene")),
CreateAdverseReaction(BaseCDAModel.CreateCodableText("117491007", CodingSystem.SNOMED, "trans-Nonachlor"))
};
return reactions;
}Once the correct values are replaced, you can create a CDA package from the CDA document (XML file). Before moving onto the next step, create the Specialist Letter clinical document.
3. Run the application and click Create Specialist Letter Sample on the UploadDocuments form and it should create the clinical document in the provided local path.
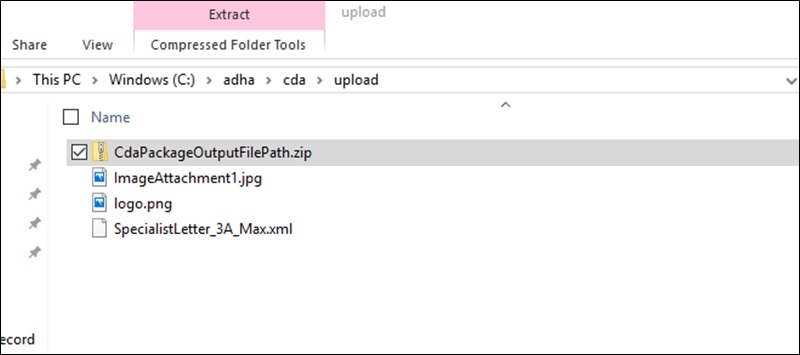
4. If IncludeLogo is set to true, your logo must be present inside the OutputFolderPath as per the code below.
Step 4: Create a CDA package from a clinical document
Next, create the CDA Package using the clinical document you generated earlier.
Step 4.1. Run the following command in the package Manager console to install the CDAPackage library:
Install-Package Nehta.VendorLibrary.CDAPackage 
Once the library is installed successfully, add the following namespace in the UploadDocuments form class.
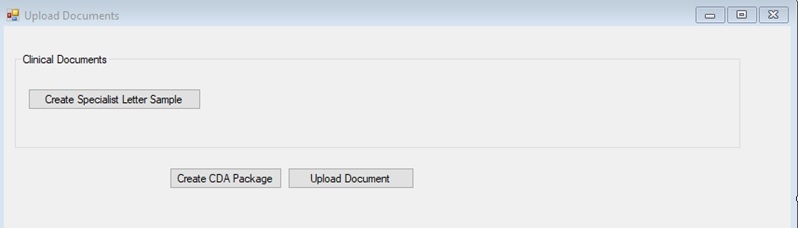
using Nehta.VendorLibrary.CDAPackage;Step 4.2. Add a new button labelled Create CDA Package.
Step 4.3. Double click on the Create CDA Package button and add the following code on the button click event. Make the following changes;
a) Replace the values for the approver, this may be the document author. The PersonId can be namespace-qualified HPI-I or local identifier.
b) Uncomment the image attachment code to include attachments.
private void btnCreateCDAPack_Click(object sender, EventArgs e)
{
// ------------------------------------------------------------------------------
// Create CDAPackage
// ------------------------------------------------------------------------------
//// Create an approver
var approver = new Approver()
{
PersonId = new Uri("http://ns.electronichealth.net.au/id/hi/hpii/1.0/800361583333XXXX"),
PersonFamilyName = "Jones",
PersonGivenNames = new List<string> { "Anna" },
PersonNameSuffixes = new List<string> { "MD", "JR" },
PersonTitles = new List<string> { "MR", "DR" }
};
// Create a CDAPackage instance
var package = new CDAPackage(approver);
// Create the CDA root document for the CDA package
package.CreateRootDocument(File.ReadAllBytes(@"C:\adha\cda\upload\SpecialistLetter_3A_Max.xml"));
// Add an image attachment
//package.AddDocumentAttachment(
// "ImageAttachment1.jpg",
// File.ReadAllBytes(@"C:\adha\cda\upload\ImageAttachment1.jpg")
// );
// Add another image attachment
//package.AddDocumentAttachment(
// "ImageAttachment2.png",
// File.ReadAllBytes("ImageAttachment2.png")
// );
// Create the CDA package zip
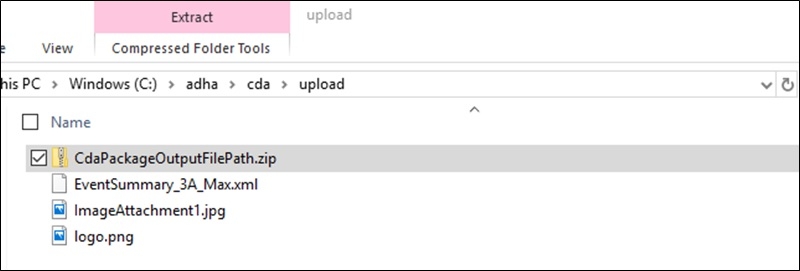
CDAPackageUtility.CreateZip(package, @"C:\adha\cda\upload\CdaPackageOutputFilePath.zip", cert);
}Step 4.4. Run the application and create the CDA package.
Step 5: Upload a clinical document
Step 5.1. Add a new button labelled Upload Document on the UploadDocumentsForm as shown in the screenshot below.
Step 5.2. Double click on the Upload Document button and add the following code on the button click event.
private void btnUploadDocument_Click(object sender, EventArgs e)
{

    // Override this value to the current patient's IHI.
    header.IhiNumber = "800360866670XXXX";

    // Create the client
    UploadDocumentClient uploadDocumentClient = new UploadDocumentClient(
        new Uri("https://services.svt.gw.myhealthrecord.gov.au/uploadDocument"), cert, cert);

    // Add server certificate validation callback
    ServicePointManager.ServerCertificateValidationCallback += ValidateServiceCertificate;

    byte[] packageBytes = File.ReadAllBytes(@"C:\adha\cda\upload\CdaPackageOutputFilePath.zip");

    // For example (formateCodeName - formatCode):
    // Specialist Letter 3A 1.2.36.1.2001.1006.1.16615.31
    ProvideAndRegisterDocumentSetRequestType request = uploadDocumentClient.CreateRequestForNewDocument(
        packageBytes,
        "formatCode",
        "formatCodeName",
        HealthcareFacilityTypeCodes.GeneralPractice,                // Update to relevant code
        PracticeSettingTypes.GeneralPracticeMedicalClinicService    // Update to relevant code
        );

    // in the metadata, use the utility function below.
    // uploadDocumentClient.AddRepositoryIdAndCalculateHashAndSize(request, "REPOSITORY_UNIQUE_ID");

    try
    {
        // Invoke the service
        RegistryResponseType registryResponse = uploadDocumentClient.UploadDocument(header, request);

        // Get the soap request and response
        string soapRequest = uploadDocumentClient.SoapMessages.SoapRequest;
        string soapResponse = uploadDocumentClient.SoapMessages.SoapResponse;
    }
    catch (FaultException fex)
    {
        // Handle any errors
    }
}
Step 5.3. Replace the IHI in the header. This must match with the subject of care given in the previous step.
// Override this value to the current patient's IHI.
header.IhiNumber = "800360866670XXXX";
Step 5.4. Provide the file path of CDA Package created in the previous step.
byte[] packageBytes = File.ReadAllBytes(@"C:\adha\cda\upload\CdaPackageOutputFilePath.zip");Step 5.5. Replace the formatCode and formatCodeName as per the clinical document. For example, formatCode for Specialist Letter 3A is “1.2.36.1.2001.1006.1.16615.31”.
Important
It is important to understand the purpose of the formatCode value. The formatCode refers to the Template Package ID that the CDA Document level conforms to. up to date list of values for formatCode for clinical documents can be found on the developer website inside the template package library for each specific clinical document type.
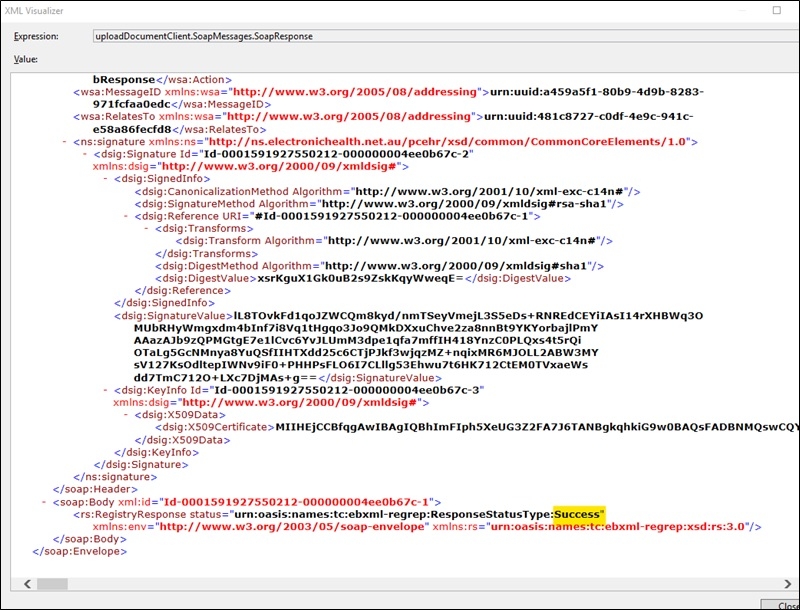
Step 5.6. Run the application and click the Upload Document button. The UploadDocument web service returns the following SOAP response if the document is uploaded successfully. Note that we have removed the contents of <soap:Header> for readability.
<?xml version="1.0"?>
<soap:Envelope xmlns:soap="http://www.w3.org/2003/05/soap-envelope"><soap:Header></soap:Header><soap:Body xml:id="Id-0001591841018735-ffffffff940adb55-1"><rs:RegistryResponse status="urn:oasis:names:tc:ebxml-regrep:ResponseStatusType:Success" xmlns:env="http://www.w3.org/2003/05/soap-envelope" xmlns:rs="urn:oasis:names:tc:ebxml-regrep:xsd:rs:3.0"/></soap:Body></soap:Envelope
Step 6: Event Summary prerequisites
Important
Some of the following steps are repetitive if you have created a Specialist Letter in the previous steps. Please select carefully which sections to learn depending on which clinical documents you will need to upload.
This section will detail how to develop code to generate an Event Summary sample from the sample code available on the Agency’s GitHub. The following steps will not be repeated 1) creating the CDA Package from the clinical document and 2) uploading the clinical document, as they are the same as Step 4 and Step 5 above.
Step 6.1. Create a new class called EventSummarySample in your existing project and copy the code from the GitHub Link into this new class. Please be mindful of the namespace of your class, do not replace from the sample code.
Ensure the following namespaces are added correctly.
using System.Xml;
using Nehta.VendorLibrary.CDA;
using Nehta.VendorLibrary.CDA.Generator.Enums;
using Nehta.VendorLibrary.CDA.SCSModel.Common.Entities;
using Nehta.VendorLibrary.Common;
using Nehta.VendorLibrary.CDA.Generator;
using Nehta.VendorLibrary.CDA.Common.Enums;
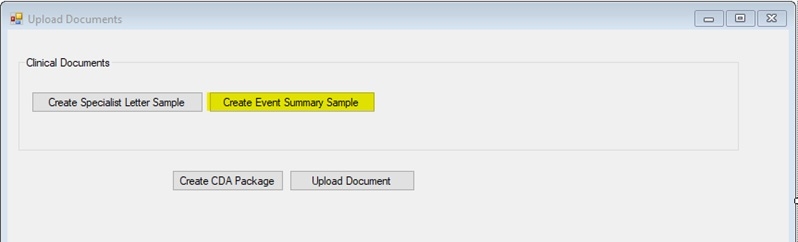
using Nehta.VendorLibrary.CDA.Common;
using Nehta.VendorLibrary.CDA.SCSModel;
using Nehta.VendorLibrary.CDA.SCSModel.Common;Step 6.2. Add a new button Create Event Summary Sample on the UploadDocuments form.
Step 6.3. Double click on Create Event Summary Sample button and add the following code on click event.
private void btnCreateEventSummary_Click(object sender, EventArgs e)
{
var eEventSummarySampleCode = new EventSummarySample();
EventSummarySample.OutputFolderPath = @"C:\adha\cda\upload";
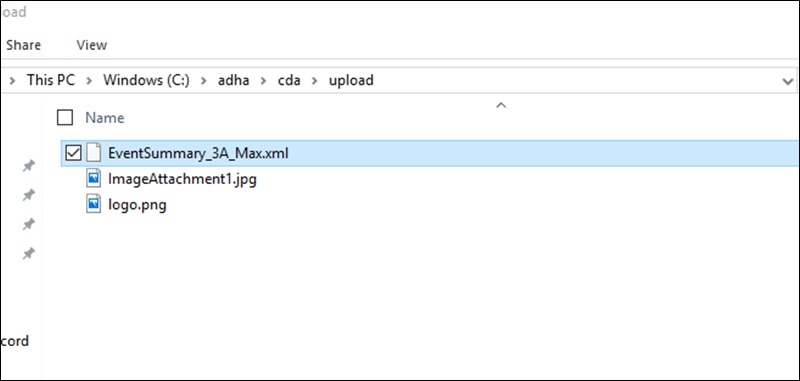
var maxEventSummaryCda = eEventSummarySampleCode.MaxPopulatedEventSummary("EventSummary_3A_Max.xml");
}Step 7: Replace data for an Event Summary
In the next steps you will use the EventSummarySample class. You will be updating data for the provider organisation and certificates.
Important
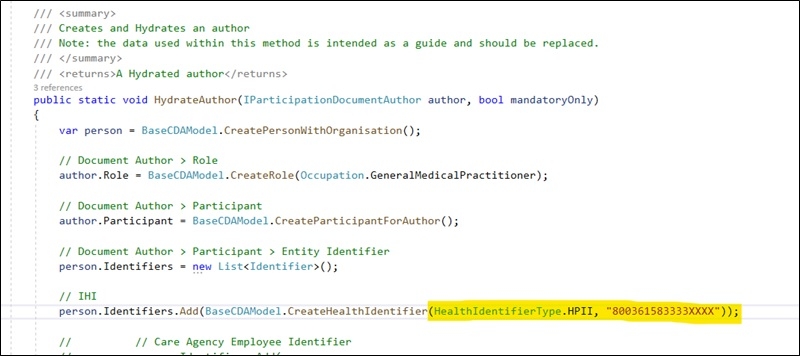
The data used within this method is intended as a guide and should be replaced.
Step 7.1. Open the MaxPopulatedEventSummary method. The code below creates the Event Summary sample and generates the XML document on your local file system.
There are two parts of the data in the Event Summary, first is the SCS Context model and second is Content model.
public XmlDocument MinPopulatedEventSummary(string fileName)
{
    XmlDocument xmlDoc;

    var eEventSummary = PopulatedEventSummary(true);

    try
    {
        CDAGenerator.NarrativeGenerator = new CDANarrativeGenerator();

        //Pass the Event Summary model into the GenerateEventSummary method
        xmlDoc = CDAGenerator.GenerateEventSummary(eEventSummary);

        using (var writer = XmlWriter.Create(OutputFolderPath + @"\" + fileName, new XmlWriterSettings { Indent = true }))
        {
            if (!fileName.IsNullOrEmptyWhitespace()) xmlDoc.Save(writer);
        }
    }
    catch (ValidationException ex)
    {
        //Catch any validation exceptions
        var validationMessages = ex.GetMessagesString();

        //Handle any validation errors as appropriate.
        throw;
    }

    return xmlDoc;
}
Step 7.2. Navigate to the PopulatedEventSummary(false) method, replace the custodian, authenticator, author and subject of care values as per your data. In the Specialist Letter sample from previous steps, all SCS context values have already been replaced because it is using the same GenericObjectReuseSample class (excluding the author) and it uses the HydrateAuthorV2 method instead of HydrateAuthor.
// Custodian
cdaContext.Custodian = BaseCDAModel.CreateCustodian();
GenericObjectReuseSample.HydrateCustodian(cdaContext.Custodian, mandatorySectionsOnly);
cdaContext.LegalAuthenticator = BaseCDAModel.CreateLegalAuthenticator();
GenericObjectReuseSample.HydrateAuthenticator(cdaContext.LegalAuthenticator, mandatorySectionsOnly);
// Setup and Populate the SCS Context model
eventSummary.SCSContext.Author = BaseCDAModel.CreateAuthor();
GenericObjectReuseSample.HydrateAuthorV2(eventSummary.SCSContext.Author, mandatorySectionsOnly);
eventSummary.SCSContext.SubjectOfCare = BaseCDAModel.CreateSubjectOfCare();
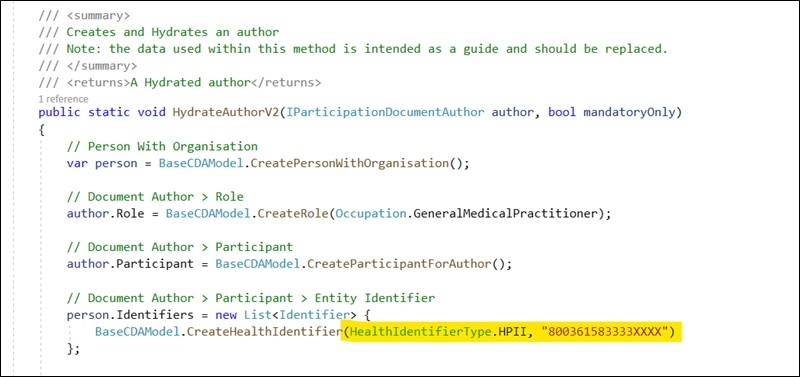
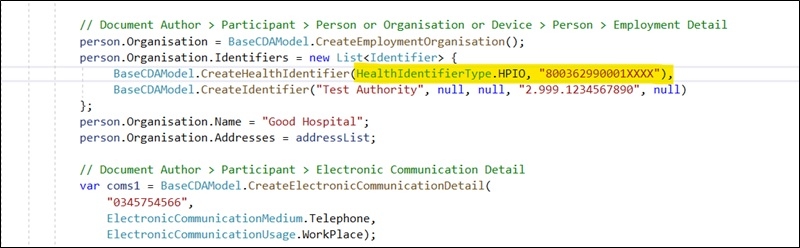
GenericObjectReuseSample.HydrateSubjectofCare(eventSummary.SCSContext.SubjectOfCare, mandatorySectionsOnly, false);Step 7.3. Navigate to the GenericObjectReuseSample.HydrateAuthorV2 method and replace the author HPI-I value and HPI-O value:
Step 7.4. Next replace the content model values. In your real software the healthcare provider would enter most of this data locally and your system would store it in your local data storage. We will be using the Event Summary sample class data already contained in the following objects.
#region Setup and populate the SCS Content model
// Setup and populate the SCS Content model
eventSummary.SCSContent = EventSummary.CreateSCSContent();

if (!mandatorySectionsOnly)
{
    eventSummary.SCSContent.EventDetails = CreateEventDetails();

    // Adverse reactions
    eventSummary.SCSContent.AdverseReactions = CreateAdverseReactions();

    // Medications
    eventSummary.SCSContent.Medications = CreateMedications();

    // Medical history
    eventSummary.SCSContent.DiagnosesIntervention = CreateDiagnosesIntervention(mandatorySectionsOnly);

    // Immunisations
    eventSummary.SCSContent.Immunisations = CreateImmunisations();

    // Diagnostic Investigations
    eventSummary.SCSContent.DiagnosticInvestigations = CreateDiagnosticInvestigations(mandatorySectionsOnly);
}

#endregion
You can navigate to each method and modify the data as required. For example, to modify Medications and enter a hard-coded value, go to
// Medications
eventSummary.SCSContent.Medications = CreateMedications();
private static List<IMedicationItem> CreateMedications()
{
var medicationList = new List<IMedicationItem>
{
CreateMedication("79115011000036100", "paracetamol 500 mg + codeine phosphate hemihydrate 30 mg tablet"),
CreateMedication("45260011000036108", "dextropropoxyphene hydrochloride 32.5 mg + paracetamol 325 mg tablet")
};
return medicationList;
}Step 7.5. Run the application and click the Create Event Summary button to generate the CDA Package.
Step 7.6. As per the previous Specialist Letter example, ensure the Logo file is in the specified directory if IncludeLogo is set to true, as shown in the screenshot.
Step 8: Create and upload a CDA Package
This step uses almost identical code that we have used to create the CDA Package and upload the Specialist Letter. We will replace the Specialist Letter with the Event Summary sample document.
Step 8.1. Double click on the Create CDA Package button and modify the code as below.
a. Replace the correct value of the HPI-I in values for the approver, this may beis the document author. The PersonId can be namespace-qualified HPI-I or local identifier.
b. Replace the Specialist Letter XML file with the Event Summary XML document created in the previous step.
private void btnCreateCDAPack_Click(object sender, EventArgs e)
{
    // ------------------------------------------------------------------------------
    // Create CDAPackage
    // ------------------------------------------------------------------------------

    //// Create an approver
    var approver = new Approver()
    {
        PersonId = new Uri("http://ns.electronichealth.net.au/id/hi/hpii/1.0/800361583333XXXX"),
        PersonFamilyName = "Jones",
        PersonGivenNames = new List<string> { "Anna" },
        PersonNameSuffixes = new List<string> { "MD", "JR" },
        PersonTitles = new List<string> { "MR", "DR" }
    };

    // Create a CDAPackage instance
    var package = new CDAPackage(approver);

    // Create the CDA root document for the CDA package
    package.CreateRootDocument(File.ReadAllBytes(@"C:\adha\cda\upload\EventSummary_3A_Max.xml"));

    // Add an image attachment
    //package.AddDocumentAttachment(
    //    "ImageAttachment1.jpg",
    //    File.ReadAllBytes(@"C:\adha\cda\upload\ImageAttachment1.jpg")
    //    );

    // Add another image attachment
    //package.AddDocumentAttachment(
    //    "ImageAttachment2.png",
    //    File.ReadAllBytes("ImageAttachment2.png")
    //    );

    // Create the CDA package zip
    CDAPackageUtility.CreateZip(package, @"C:\adha\cda\upload\CdaPackageOutputFilePath.zip", cert);
}
Step 8.2. Run the application and create the CDA Package from the Event Summary Sample document.
Step 8.3. Double click on the Upload Document button on the UploadDocuments form and replace the values based on the Event Summary sample document.
a. The IHI in the header must match the subject of care in previous steps.
b. Replace the correct formatCode and formatCodeName i.e. Event Summary Report 3A - 1.2.36.1.2001.1006.1.16473.14
private void btnUploadDocument_Click(object sender, EventArgs e)
        {

            // Override this value to the current patient's IHI.
            header.IhiNumber = "800360866670XXXX";

            // Create the client
            UploadDocumentClient uploadDocumentClient = new UploadDocumentClient(
                new Uri("https://services.svt.gw.myhealthrecord.gov.au/uploadDocument"), cert, cert);

            // Add server certificate validation callback
            ServicePointManager.ServerCertificateValidationCallback += ValidateServiceCertificate;

            byte[] packageBytes = File.ReadAllBytes(@"C:\adha\cda\upload\CdaPackageOutputFilePath.zip"); // Create a package

            // For example (formateCodeName - formatCode):
            // "eHealth Dispense Record" - 1.2.36.1.2001.1006.1.171.5
            // "Pathology Report" - 1.2.36.1.2001.1006.1.220.4
            // "Diagnostic Imaging Report" - 1.2.36.1.2001.1006.1.222.4
            // Event Summary Report 3A - 1.2.36.1.2001.1006.1.16473.14
            ProvideAndRegisterDocumentSetRequestType request = uploadDocumentClient.CreateRequestForNewDocument(
                packageBytes,
                "formatCode",
                "formatCodeName",
                HealthcareFacilityTypeCodes.GeneralPractice,                // Update to relevant code
                PracticeSettingTypes.GeneralPracticeMedicalClinicService    // Update to relevant code
                );

            // in the metadata, use the utility function below.
            // uploadDocumentClient.AddRepositoryIdAndCalculateHashAndSize(request, "REPOSITORY_UNIQUE_ID");

            try
            {
                // Invoke the service
                RegistryResponseType registryResponse = uploadDocumentClient.UploadDocument(header, request);

                // Get the soap request and response
                string soapRequest = uploadDocumentClient.SoapMessages.SoapRequest;
                string soapResponse = uploadDocumentClient.SoapMessages.SoapResponse;
            }
            catch (FaultException fex)
            {
                // Handle any errors
            }
        }
Important
Find the latest formatCode values for clinical documents on the developer website inside the template package library.
Step 8.4. Run the application and click Upload Document. If the document is uploaded successfully, it will return the SOAP response as shown in the screenshot below.
Step 9: Prescription Record prerequisites
The Prescription Record clinical document is similar to the Specialist Letter and Event Summary that you have already created. You will look into sample code available on GitHub to create the Prescription Record sample in the same project.
Step 9.1. Create a new class called PrescriptionRecordSample.cs in the existing project.
namespace ADHA.MyHR.ClinicalDocuments
{
    public class PrescriptionRecordSample
    {

    }

}
Tip
You may choose to add a new folder into your project titled Clinical Documents and move all of the sample classes into the new folder.
Step 9.2. Copy the code from the GitHub Link and paste it into your newly created class. Be mindful of replacing your class namespace.
Step 9.3. Add the additional following namespace which is not included in the sample code.
using Nehta.VendorLibrary.CDA;Step 9.4. PrescriptionRecordSample class should compile now and ready to be used.

Step 9.5. Add a new button labelled Create Prescription Record on the UploadDocumentsForm.
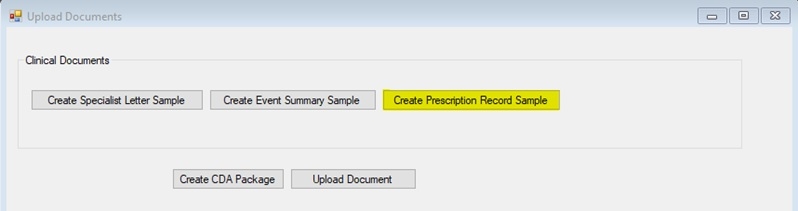
Step 9.6. Double click on the Create Prescription Record button and add the following code on the button click event. This code creates a Prescription Record which is heavily populated.
private void btnCreatePrescription_Click(object sender, EventArgs e)
{
var prescriptionRecord = new PrescriptionRecordSample();
PrescriptionRecordSample.OutputFolderPath = @"C:\adha\cda\upload";
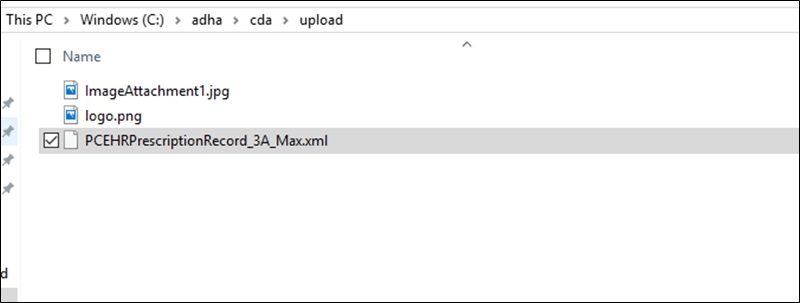
var maxPrescriptionRecord = prescriptionRecord.MaxPopulatedPrescriptionRecordSample("PCEHRPrescriptionRecord_3A_Max.xml");
}Step 9.7. Inside the MaxPopulatedPrescriptionRecordSample method, navigate to the PopulatePrescriptionRecord method and replace organisation and installed certificates along with the following values as done for the previous clinical documents.
a. Custodian
b. Legal Authenticator
c. Prescriber
d. Prescriber Organisation
e. Subject of Care
Step 9.8. Sample prescription data (the SCS Content model) is provided and can be replaced using values from your local system’s data.
internal static IPCEHRPrescriptionItem CreatePrescriptionItem(Boolean mandatorySectionsOnly, string prescriptionId)
{
    var prescriptionItem = PCEHRPrescriptionRecord.CreatePrescriptionItem();

    // The Dispensing Information Object
    prescriptionItem.DispensingInformation = CreateDispensingInformation(mandatorySectionsOnly);

    // Prescription Item Identifier - A globally unique object identifier for each instance of a Medication Instruction
    prescriptionItem.PrescriptionItemIdentifier = BaseCDAModel.CreateIdentifier("1.2.36.1.2001.1005.36", BaseCDAModel.CreateGuid());

    if (!mandatorySectionsOnly)
    {
        // Therapeutic Good Identification - The medicine, vaccine or other therapeutic good being ordered, administered to or used by the subject of care
        prescriptionItem.TherapeuticGoodId = BaseCDAModel.CreateCodableText("01158Y", CodingSystem.PBSCode, "cimetidine 400 mg tablet, 60", null, null);

        // Therapeutic Good Strength (Additional Therapeutic Good Detail) - Information concerning the strength of the Therapeutic Good
        prescriptionItem.TherapeuticGoodStrength = "Therapeutic Good Strength";

        // Therapeutic Good Generic Name (Additional Therapeutic Good Detail) - The generic name of the Therapeutic Good
        prescriptionItem.TherapeuticGoodGenericName = "Therapeutic Good Generic Name";

        // Directions - A complete narrative description of how much, when and how to use the medicine, vaccine or other therapeutic good
        prescriptionItem.Directions = "Directions";

        // Formula - The recipe for compounding a medicine
        prescriptionItem.Formula = "Formula";

        // Form - The formulation or presentation of the overall substance
        prescriptionItem.Form = BaseCDAModel.CreateCodableText("385057009", CodingSystem.SNOMED, "Film-coated tablet", null, null);

        // ClinicalIndication - A reason for ordering the medicine, vaccine or other therapeutic good
        prescriptionItem.ClinicalIndication = "Clinical Indication";

        // Route - The route by which the medication is administered
        prescriptionItem.Route = BaseCDAModel.CreateCodableText("26643006", CodingSystem.SNOMED, "Oral route", null, null);

        // Comment - Any additional information that may be needed to ensure the continuity of supply, rationale for current dose and timing, or safe and appropriate use
        prescriptionItem.Comment = "Comment";

        // DateTime Prescription Expires
        prescriptionItem.DateTimePrescriptionExpires = new ISO8601DateTime(DateTime.Now.AddMonths(12));

        // PBS Manufacturer Code (Administrative Manufacturer Code) - Administrative code of the manufacturer of the pharmaceutical item supplied
        prescriptionItem.PBSManufacturerCode = BaseCDAModel.CreateExternalConceptIdentifier(ExternalConcepts.AustralianPBSManufacturerCode, "AB");
    }
    else
    {
        // Therapeutic Good Identification - The medicine, vaccine or other therapeutic good being ordered, administered to or used by the subject of care
        prescriptionItem.TherapeuticGoodId = BaseCDAModel.CreateCodableText("28237011000036107", CodingSystem.AMTV3, "amoxycillin 500 mg capsule, 20", null, null);
    }
    return prescriptionItem;
}
Step 9.9. Run the application and create sample prescription record.
Step 9.10. Create the CDA Package and Upload the Prescription Record. The steps to create the CDA Package from a clinical document and upload it have already been demonstrated in Step 4 and Step 5.
Step 10: Advance Care Planning Document prerequisites
This section is also very similar to other Clinical Documents created in previous steps and will use the sample code available on GitHub.
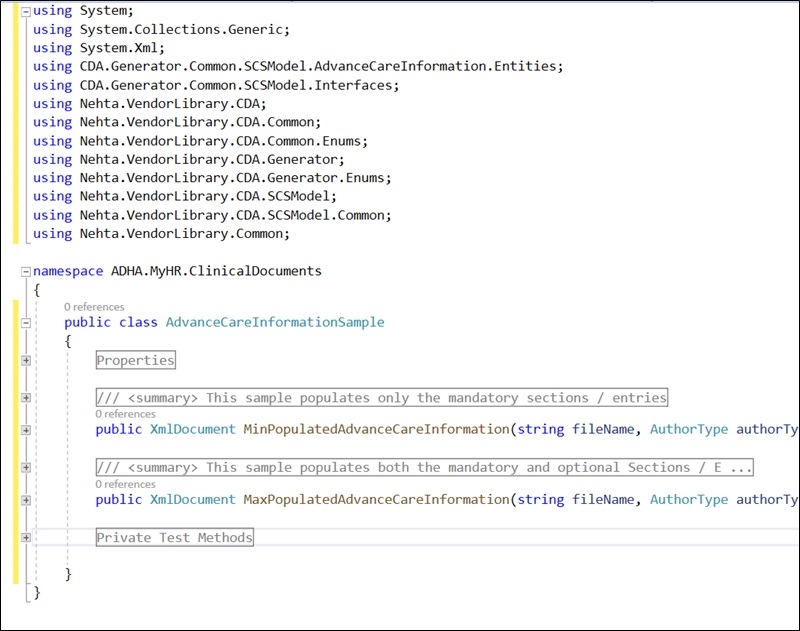
Step 10.1. Create a class called AdvanceCareInformationSample in your project.
using System;
using System.Collections.Generic;
using System.Linq;
using System.Text;
using System.Threading.Tasks;

namespace ADHA.MyHR.ClinicalDocuments
{
    class AdvanceCareInformationSample
    {
    }
}
Step 10.2. Copy the code from the sample available on ADHA GitHub and paste into your newly created class. Be mindful of not replacing your class namespace.
Step 10.3. Add a new class called GenericObjectReuseSample inside the project.
using System;
using System.Collections.Generic;
using System.Linq;
using System.Text;
using System.Threading.Tasks;

namespace ADHA.MyHR.CDA
{
    class GenericObjectReuseSample
    {
    }
}
Note
GenericObjectReuseSample is different than we have used for other Clinical Documents. Therefore, be sure to add this class again from the link provided in the different folder as the Advance Care Planning sample uses the methods from this different class.
Step 10.4. Copy the code from the sample available on GitHub and paste into the GenericObjectReuseSample class. Be mindful of not replacing the namespace of your project in the class.
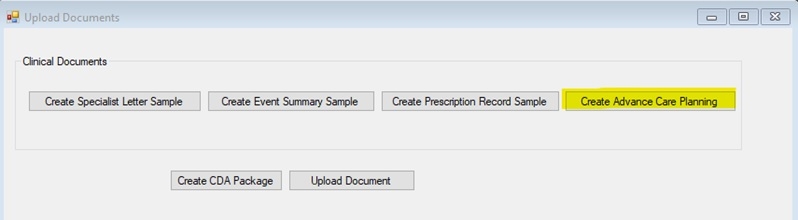
Step 10.5. Double click on the Create Advance Care Planning button and add the following code on the button click event.
private void btnCreateAdvanceCarePlanning_Click(object sender, EventArgs e)
{
    // Advance Care Information Documents
    var advanceCareInformationSample = new AdvanceCareInformationSample();
    AdvanceCareInformationSample.OutputFolderPath = @"C:\adha\cda\upload";
    var minAdvanceCarePlanningAuthorHealthcareProviderSampleCda = advanceCareInformationSample.MinPopulatedAdvanceCareInformation("AdvanceCarePlanningSampleAuthorHealthcareProvider_3A_Min.xml", Nehta.VendorLibrary.CDA.Common.Enums.AuthorType.AuthorHealthcareProvider, Nehta.VendorLibrary.CDA.Common.Enums.DocumentType.AdvanceCareInformationAdvanceCarePlanning);
    //var maxAdvanceCarePlanningAuthorHealthcareProviderSampleCda = advanceCareInformationSample.MaxPopulatedAdvanceCareInformation("AdvanceCarePlanningSampleAuthorHealthcareProvider_3A_Max.xml", Nehta.VendorLibrary.CDA.Common.Enums.AuthorType.AuthorHealthcareProvider, Nehta.VendorLibrary.CDA.Common.Enums.DocumentType.AdvanceCareInformationAdvanceCarePlanning);
}
Step 10.6. Replace the custodian, legalAuthenticator, author, and subjectOfCare values as per your data.
Step 10.7. Once the values are replaced correctly you can create the CDA Package out of the Advance Care Planning Clinical Document and upload it to the patient’s My Health Record as per Step 4 and Step 5.
Step 11: Use Case 201 (UC.CIS.201)
| Test Case ID | PCEHR_CIS_019042 |
|---|---|
| Objective | The clinical information system shall provide an ability to support the withdrawal of the healthcare recipient's consent to upload clinical documents to the PCEHR System and shall prevent them from being uploaded where the consent has been withdrawn. |
| How to evaluate | Withdraw consent either before or after creating a clinical document for a healthcare recipient: a. Verify the software provides the ability to withdraw consent to upload the document to the PCEHR System. b. Verify that the document is not uploaded to the PCEHR system. |
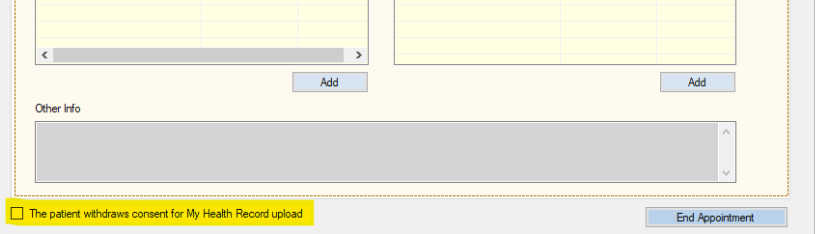
This test case explains that CIS software shall have the capability for the user to withdraw consent from uploading a Clinical Document. CIS software shall not upload a Clinical Document if the healthcare recipient advises the healthcare provider (your user) that they do not wish for it to be uploaded.
Important
The My Health Record system works on the premise of Standing Consent. This means that unless a healthcare recipient specifically advises the healthcare provider not to upload, then an upload can occur. Your software will need to have an option to stop an upload, however the default state will likely be to upload as part of the clinical workflow.
The screenshot below provides an example of a UI element to stop an upload from occurring while not negatively impacting the clinical workflow.
| Test Case ID | PCEHR_CIS_019042a |
|---|---|
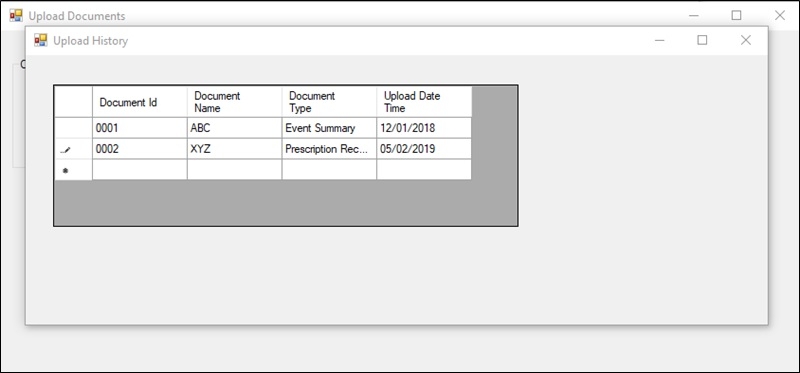
| Objective | The Clinical Information System shall provide a mechanism to identify which clinical documents have been uploaded to the PCEHR System. |
| How to evaluate | Create a clinical document for a healthcare recipient using the software, and upload the clinical document to the PCEHR System: a. Verify that the software has a mechanism to record that a document has been uploaded to the PCEHR. |
This test case explains that every time a Clinical Document is uploaded, your software shall record this transaction. The following code provides a very simplified mechanism for you to invoke your software logging mechanism when the web service returns the success message.
try
{
    // Invoke the service
    RegistryResponseType registryResponse = uploadDocumentClient.UploadDocument(header, request);


    if(registryResponse.status.Contains("Success"))
    {
        // Add document into upload history.

    }

}
catch (FaultException fex)
{
    // Handle any errors
}
Sample screenshot demonstrating the clinical document upload history. You will want to capture much more detail about this transaction to assist users and your support team in troubleshooting issues.
| Test Case ID | PCEHR_CIS_017841a |
|---|---|
| Objective | The Clinical Information System shall either: • Retain any clinical document uploaded to the PCEHR System; or • Retain the original clinical information used to generate the clinical document uploaded to the PCEHR; to meet requirements for relevant health records legislation, audit and business requirements. |
| How to evaluate | Create a clinical document for a healthcare recipient using the software, and upload the clinical document to the PCEHR System: Verify that the software system fulfils either criteria a or b: a. Retains the clinical information used to create the clinical documents locally. b. Retains a copy of the clinical document that was uploaded |
This test case requires that when a Clinical Document is successfully uploaded, it shall store either a copy of the Clinical Document or retain the clinical information to produce the document again.
This test case can be met easily by storing a copy of the Clinical Document or CDA Package on the file system or you can undertake a more advanced method of tracking which data was included within your database.
Conclusion
This guide has walked through the steps to implement the uploadDocument web service. The next guide will continue from this point and explore more functionality of the My Health Record system. Specifically, you will learn how to supersede a clinical document and how to remove a clinical document, which are both requirements of uploading.
If you have any feedback about this guide, please contact us at help@digitalhealth.gov.au.
View All | Back | Next: Supersede document - My Health Record B2B Developer Guide 6