Reading & Development: 2 hours
Quick Intro
In the previous guide you will have learnt about the My Health Record system, the National Provider Portal (NPP) and the CIS to NPP connection mechanism. You will also have registered as a developer and received your test kit.
In this guide, we will cover;
- How to implement CIS to NPP into your software
- Solution overview
- Conformance Test Requirements
Prerequisites
- Visual Studio 2013-2019
- A test HPI-O organisation identifier, HPI-I and NASH PKI Test certificate
- Within your test data, the provider individual’s HPI-I must be linked to a HPI-O
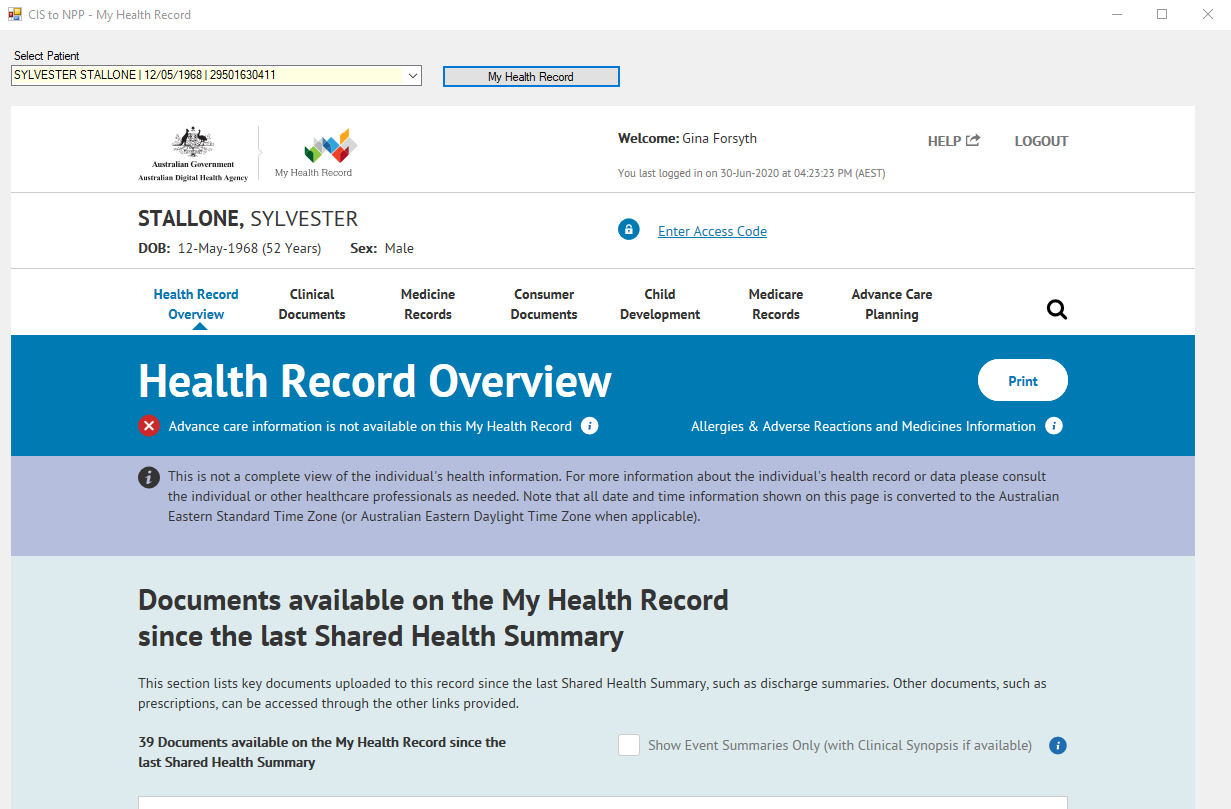
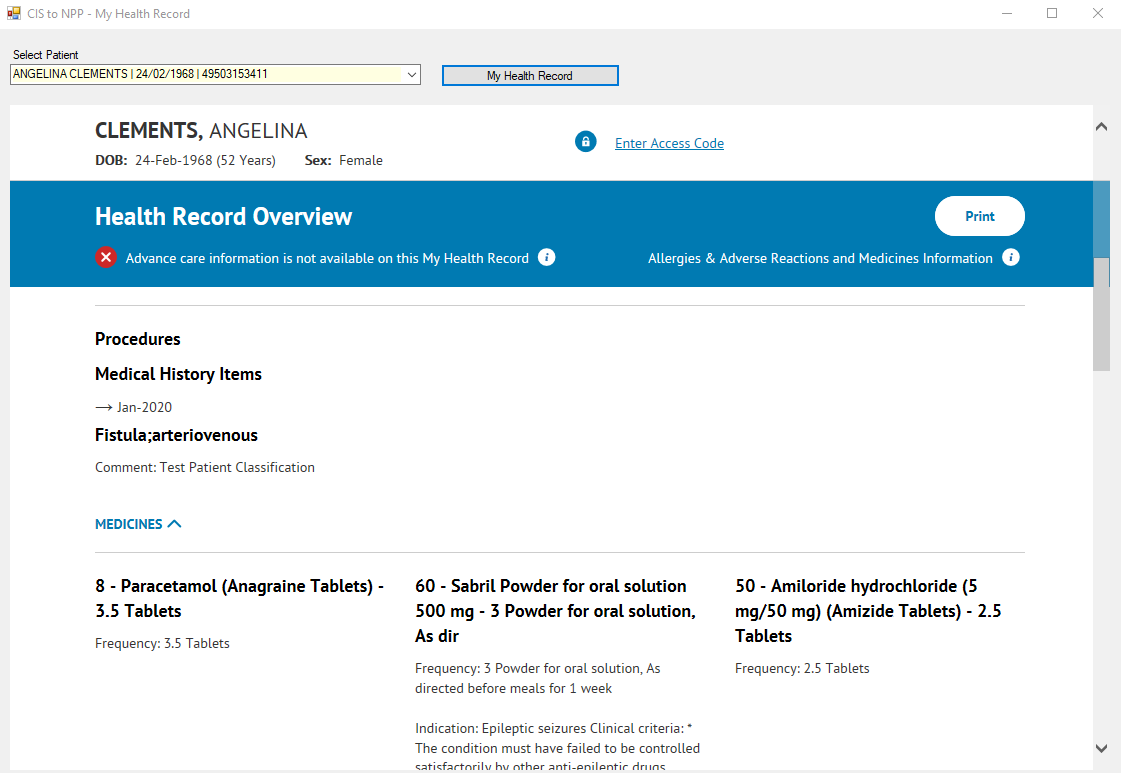
At the end of the walkthrough, we will have developed an application with a local list of patients from our test data. This application will allow the user to open a patient’s My Health Record in the embedded NPP maintaining patient context.
The screenshot below provides an example of what your users will see within the embedded NPP.
Important
You will want to familiarise yourself with the CIS to NPP documentation available here. The included Implementation Guide is likely unnecessary if you are using this developer guide.
Step 1: Create a new project and add libraries
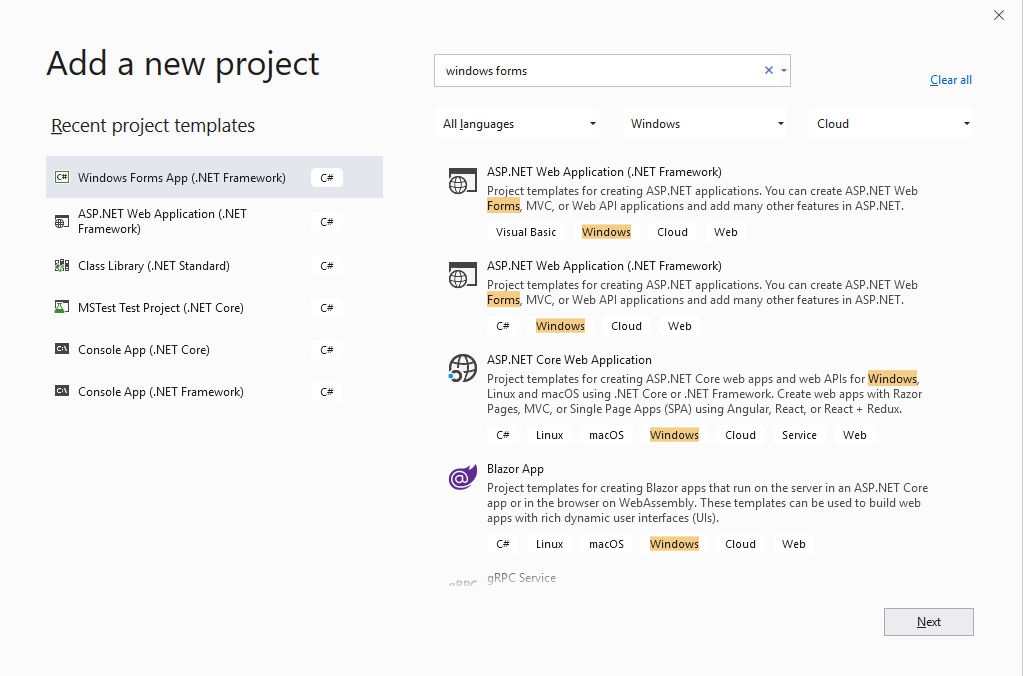
1. From the Visual Studio File menu, select New > Project.
2. Create a new Windows Forms Application using .NET Framework (C#) and select Next.
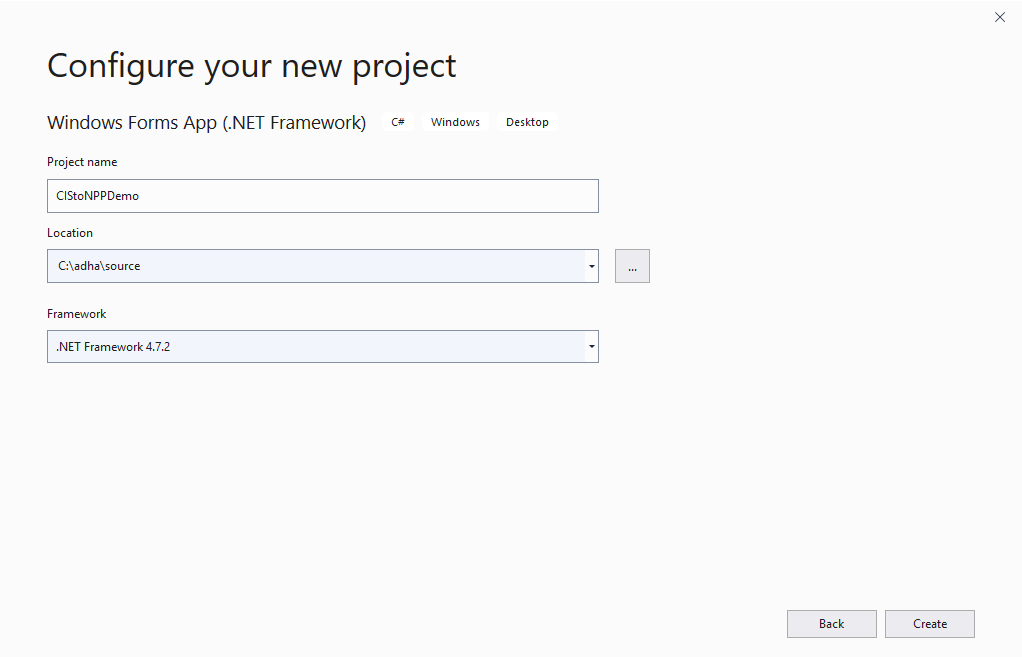
3. Name the project and set your file location
4. Once the project is created, install the required libraries using Package Manager Console – Select Tools > Nuget Package Manager > Package Manager Console
Copy the following install command, paste it into the console and press enter to install.
Install-Package Digitalhealth.MhrProviderPortalAccessStep 2: Design a sample form
1. Add a new Windows form or use the existing default form. Add elements as per the screenshot below.
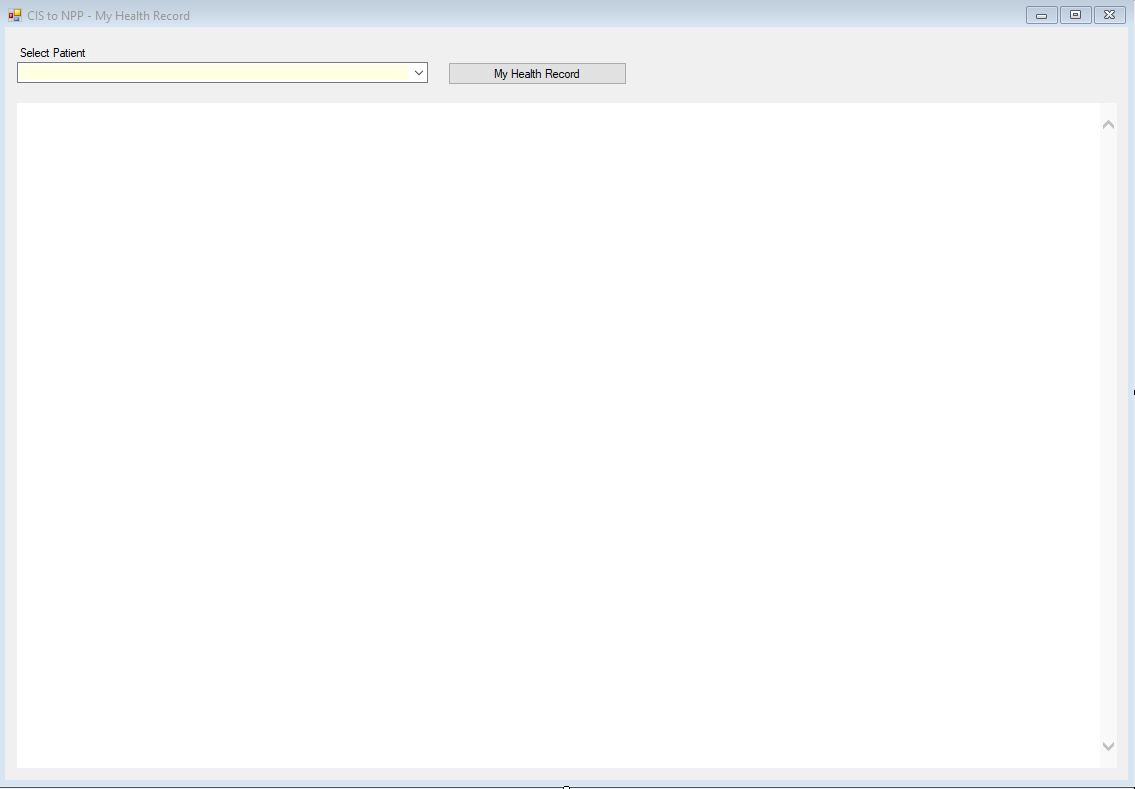
The form contains a Combo box to select the patient, a My Health Record button, and a web browser control.
Step 3: Add the code
We will create a model class called Health Recipient and create a list to store the patients’ demographic information. This information would likely be loaded from your database in your existing software.
1. Create new class called Health Recipient and copy the following code.
public class HealthRecipient
{
    public string FamilyName { get; set; }
    public string GiveName { get; set; }
    public string DOB { get; set; }
    public string Gender { get; set; }

    public string IHINumber { get; set; }
    public string MedicareNumber { get; set; }
    public string DVANumber { get; set; }

    public override string ToString()
    {
        // choose any format that suits you and display what you like
        return String.Format("{0} {1} | {2} | {3}", GiveName, FamilyName, DOB, MedicareNumber);
    }
}
2. Double click on the form and add the following code on Form Load event.
private void MainForm_Load(object sender, EventArgs e)
{
    List<HealthRecipient> patientList = new List<HealthRecipient>()
    {
        new HealthRecipient() { FamilyName="", GiveName="", DOB="", Gender="", MedicareNumber="" },
        new HealthRecipient() { FamilyName="", GiveName="", DOB="", Gender="", MedicareNumber="" }

    };
    lstSelectPatient.DataSource = patientList;
}
Modify the code above by adding test patients from the test data you have received from Services Australia.
Note
The Patient Medicare number must be an 11-digit number which includes the IRN.
3. Double click on the My Health Record button and add the following code on the button click event.
private void btnHealthRecord_Click(object sender, EventArgs e)
{
    // Set up
    // -----------------------------------------------------------------------------

    // Set the URL for the CIStoNPP endpoint- uses B2B endpoint + CIStoNPP
    string b2bEndpoint = "https://services.svt.gw.myhealthrecord.gov.au/";
    string url = b2bEndpoint + "CIStoNPP";

    // Provide Client id allocated by the NIO when registering for this interface
    string clientId = "";

    // Provide the product name and version registered
    string productName = "";
    string productVersion = "";

    // Obtain the certificate by serial number
    // Obtain the certificate by thumbprint
    X509Certificate2 clientCert = GetCertificate("XXXXX", X509FindType.FindBySerialNumber, StoreName.My, StoreLocation.CurrentUser, true);

    // Read the HPI-O out of the certificate
    string hpio = (clientCert != null ? clientCert.Subject.Split('.')[1] : "");

    // Create client
    MhrRestClient client = new MhrRestClient(url, clientId, clientCert, productName, productVersion);

    // Add HPI-I of the provider who is accessing the portal
    string hpii = "";

    var patient = (HealthRecipient)lstSelectPatient.SelectedItem;
    // Populate data from patient details
    // Get patient identifier - ONLY one of these
    string ihi = "";
    string mcn = patient.MedicareNumber;
    string dva = "";

    // Patient demographics
    string dob = Convert.ToDateTime(patient.DOB).ToString("dd-MM-yyyy");
    string gender = patient.Gender; // "M, F, U or I";
    string family = patient.FamilyName;

    // Set up the request
    try
    {
        //HTTP Response
        string response = client.GetAccessToNpp(hpio, hpii, dob, gender, family, ihi, mcn, dva);

        if (response != null)
        {
            // Display the response in a webbrowser that has internet access
            // Uncomment the following code if response is not rendered. This code     //enables to use latest version of browser.
            // Please see the link to find out browser compatiblity.
            // https://www.myhealthrecord.gov.au/for-you-your-//family/howtos/compatible-browsers

            //using (var key = Registry.CurrentUser.OpenSubKey(@"Software\Microsoft\Internet Explorer\Main\FeatureControl\FEATURE_BROWSER_EMULATION", true))
            //{
            //    var app = System.IO.Path.GetFileName(Application.ExecutablePath);
            //    key.SetValue(app, 11001, Microsoft.Win32.RegistryValueKind.DWord);
            //    key.Close();
            //}

            webBrowser1.DocumentText = response;
        }

    }
    catch (Exception)
    {
        // If an error is encountered, look at client.restResponse
        // for detailed description of the error.
        IRestResponse lookAtStatusCode = client.restResponse;
    }
}
4. Copy the GetCertificate method code below and paste it into the class.
private static X509Certificate2 GetCertificate(String findValue, X509FindType findType, StoreName storeName, StoreLocation storeLocation, bool valid)
{
    X509Store certStore = new X509Store(storeName, storeLocation);
    certStore.Open(OpenFlags.ReadOnly);

    X509Certificate2Collection foundCerts =
        certStore.Certificates.Find(findType, findValue, valid);
    certStore.Close();

    // Check if any certificates were found with the criteria
    if (foundCerts.Count == 0)
        throw new ArgumentException("Certificate was not found with criteria '" + findValue + "'");

    // Check if more than one certificate was found with the criteria
    if (foundCerts.Count > 1)
        throw new ArgumentException("More than one certificate found with criteria '" + findValue + "'");

    return foundCerts[0];
}
More Information
You can find the complete sample code on the ADHA GitHub Link.
5. Replace the following values carefully in the above code.
| Value | Replace |
| Client Id | Provide Client id allocated by the NIO when registering for this interface |
| Product Name | Provide the product name you have registered |
| Product Version | Provide the product version you have registered |
| Certificate Serial Number or Thumbprint | Obtain the installed certificate by serial number or thumb print |
| HPI-I | HPII of provider accessing portal |
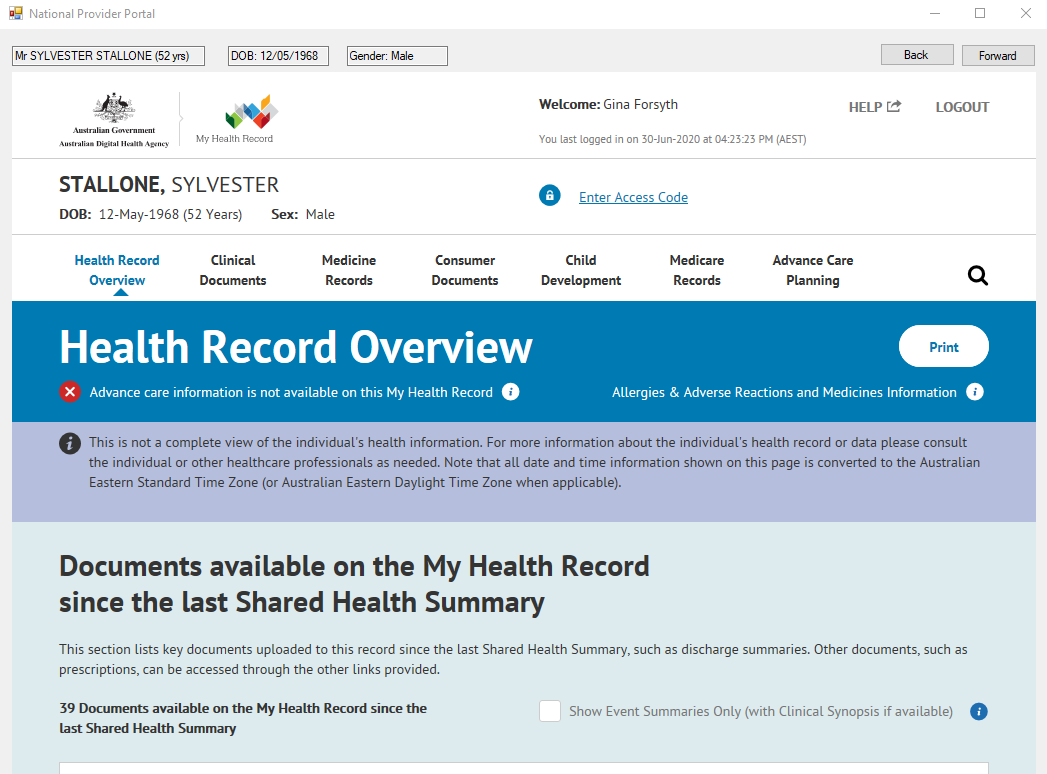
6. Run the application and you should see a patient’s My Health Record as per the screenshot below.
Step 4: Solution overview
The following information provides a bit more detail as to how the CIS to NPP works.
1. The user your software and uses existing local functionality to search and open a patient. A My Health Record button (or similar) triggers the request to the My Health Record system.
2. Your software sends the NASH certified mutually authenticated POST request with a NASH signed JSON Web Token (JWT). The JWT Parameters to include (but not limited to);
- Patient Medicare number (IRN)/DVA number/IHI
- Patient Family Name
- Patient First Name (optional)
- Patient DOB
- HPIO
- HPII
Note: If you have included multiple identifiers in your request, they will be used in priority order as per the following list.
- 1 - IHI
- 2 - MCN (IRN)
- 3 - DVA
3. The NPP performs validation of Mutual Authentication by inspecting (but not limited to):
- Trusted CA
- Certificate Expiry date
- CRL Revocation
4. The NPP performs validation of the JWT Token – validating parameters (but not limited to):
- JWT Signature
- Expiry validation
- Iss validation
- Check if HPIO number matches the certificate HPIO
- Check if HPII is linked to provided HPIO\
5. If the response code is OK 200 then the NPP returns a body with HTML content.
6. The System browser or your embedded browser control is launched with the returned HTML content for the healthcare provider to view.
7. If the response code is not OK 200 then the NPP returns a response with a JSON object detailing the type of error, as seen in the example below. The message must be conveyed to the end user.
{
"code”: "400 Bad Request",
"severity”: "error",
"message”: "The request includes an invalid sex."
}
Step 5: Conformance requirements and testing
In this section, we will be covering several example test cases from 2 use cases. You should now familiarise yourself with the complete list of use cases and test cases by viewing the Conformance Test Specification which you should have downloaded earlier. There are 3 use cases in total and about 5-10 test cases per use case.
Step 5a: Use Case CIStoNPP.001
| Use Case Name | CIStoNPP.001 |
|---|---|
| Objective | An authorised user of a Clinical Information System (CIS) accessing My Health Record (MHR) from National Provider Portal (NPP) within their own CIS using web-browser component. |
| How to evaluate | NPP content displays through Clinical Information System. |
| Test Case ID | CIStoNPP_003 |
|---|---|
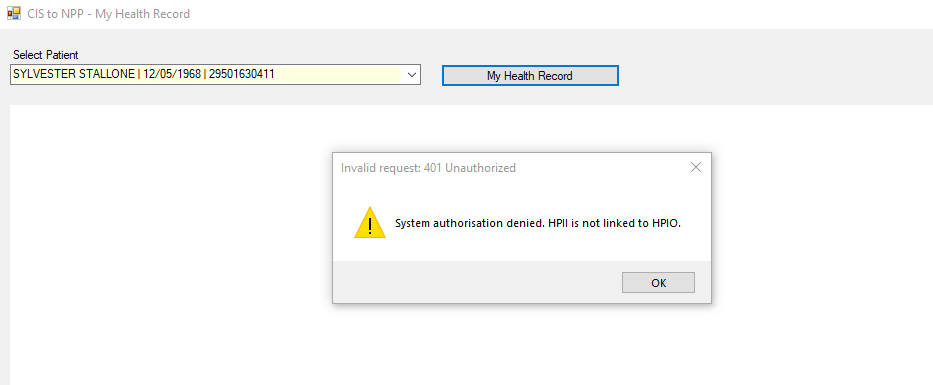
| Conformance Requirement | Error message displaying All errors returned from the NPP to CIS via the web service interface SHALL be displayed to the user of the vendor’s software. |
This test case explains that any error returned from the NPP response must be handled and displayed to the user. The following code and screenshot covers the handling of one of the errors from the list. As a test, try sending a request with an HPI-I which is not linked to the organisation.
Note
The example below is for demonstration purposes only; it is up to each developer to handle error messages and leverage any existing functionality they may have.
using System.Web.Script.Serialization;class HttpResponseError
{
public string Code { get; set; }
public string Severity { get; set; }
public string Message { get; set; }
}try
{
//HTTP Response
string response = client.GetAccessToNpp(hpio, hpii, dob, gender, family, ihi, mcn, dva);
if (response != null)
{
webBrowser1.DocumentText = response;
} else
{
// Deserialize json response into HttpResponseError created in previous code.
var error = new JavaScriptSerializer().Deserialize<HttpResponseError>(client.restResponse.Content);
MessageBox.Show(error.Message, "Invalid request: " + error.Code, MessageBoxButtons.OK, MessageBoxIcon.Warning);
}
}
catch (Exception)
{
// If an error is encountered, look at client.restResponse
// for detailed description of the error.
IRestResponse lookAtStatusCode = client.restResponse;
}
The following table provides some of the error messages along with the HTTPS response.
| # | Issue Severity | Error Description | Comments | HTTP Error Code |
|---|---|---|---|---|
| 1 | error | System authorisation denied. HPIO relationship does not exist. | HPIO relationship doesn’t exist. | 401 Unauthorized |
| 2 | error | System authorisation denied. Inactive HPIO participation status. | HPIO is not participating in MHR or has been revoked. | 401 Unauthorized |
| 3 | error | The request is missing a mandatory parameter <parameter name>. | The request is missing a mandatory parameter. | 400 Bad Request |
To see the full list of errors, please download the CIS to NPP - Technical Service Specification
| Test Case ID | CIStoNPP_004 |
|---|---|
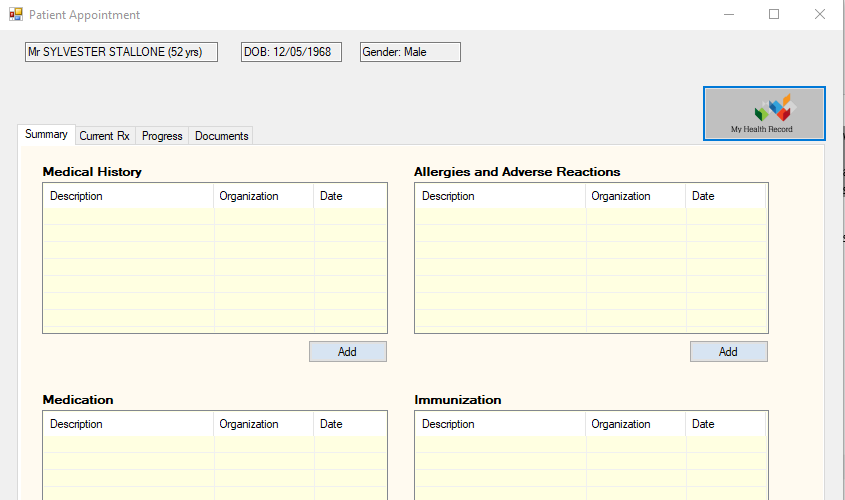
| Conformance Requirement | New session for NPP for each patient record. When selecting to view a patient record in NPP and embedding the view within a CIS web browser component, the CIS SHALL: • Open a new NPP browser window with the CIS patient in context’s details within a web browser component which is under the control of the application. • Close any prior NPP browser windows for any existing CIS patients which were in context. Alternatively, the view can be launched utilising the systems browser (the default operating system browser). |
A key purpose of this test case is to ensure there is no confusion for the user about which patient’s record is open in the browser control. Any previously open NPP windows/controls must be closed. The screenshot below is a mock-up of a Patient Appointment screen with CIS to NPP implemented using a My Health Record button on the top right side.
When the NPP window is closed for the patient, the embedded browser component can be disposed of as shown in the code
private void CIStoNPPForm_FormClosed(object sender, FormClosedEventArgs e)
{
    webBrowser1.Dispose();
}| Test Case ID | CIStoNPP_007 |
|---|---|
| Conformance Requirement | Patient identifier preference. If connected through HI service, the preferred patient identifier for the NPP SHALL be a validated IHI number. |
If a patient’s My Health Record is accessed through NPP using their IHI number (which is considered a stronger identifier than a Medicare number or DVA number), it should be validated with the HI Service. If you are using IHIs to identify your patients then you will have already completed a HI Service integration and you should be familiar with the benefit of revalidating IHIs before they are used.
Let’s assume we have a HI Service class with an IsValid method. We could implement it as per the codeblock below.
// TEST CASE # CIStoNPP_007
if (_hiService.IsValid(ihi))
{
    //HTTP Response
    string response = client.GetAccessToNpp(hpio, hpii, dob, gender, family, ihi, mcn, dva);

}| Test Case ID | CIStoNPP_008 |
|---|---|
| Conformance Requirement | Auditing capability. The Clinical Information System SHOULD have the capability to audit interactions with the NPP via B2B CIS to NPP Gateway Service. |
Auditing is important for many reasons including troubleshooting and the healthcare provider’s ability to access interactions with the My Health Record system. Your software should log all CIS to NPP transactions for audit purposes whether successful or failed. Following code demonstrate how to log successful attempts and errors returned from NPP for audit purpose. You will likely have an existing logging mechanism to leverage.
// Set up the request
try
{
    //HTTP Response
    string response = client.GetAccessToNpp(hpio, hpii, dob, gender, family, ihi, mcn, dva);

    if (response != null)
    {

        // Log successful access info.
        _logger.info("info such as HPI-I and patient info");

        webBrowser1.DocumentText = response;

    }
    else
    {
        var error = new JavaScriptSerializer().Deserialize<HttpResponseError>(client.restResponse.Content);

        // use the error info with health provider and patient informaiton
        _logger.error("error information with HPI-I and patient information");

    }

}
catch (Exception)
{
    // If an error is encountered, look at client.restResponse
    // for detailed description of the error.
    IRestResponse lookAtStatusCode = client.restResponse;
    _logger.error("error information with HPI-I and patient information");

}
Step 5b: Use Case CIStoNPP.003
| Use Case Name | CIStoNPP.003 |
|---|---|
| Objective | Clinical Information System (CIS) to National Provider Portal (NPP) user configuration of vendor's CIS. |
| How to evaluate | NPP content displays through Clinical Information System. |
| Test Case ID | CIStoNPP_019 |
|---|---|
| Conformance Requirement | "Validation of manually/OCR-input HPI-Is and HPI-Os. If the software supports the manual or OCR input of healthcare provider identifiers (individual and organisation), the software SHALL ensure that: • all sixteen digits are included; • the identifier is stored as sixteen continuous digits (no spaces); • the identifier is validated using the Luhn check digit algorithm; and • the sixth digit of the identifier equals the value below: - ‘1’ for HPI-I, or - ‘2’ for HPI-O. If the healthcare provider identifier fails any of the above checks, the software SHALL disallow its storage/use in the local system and alert the operator." |
If you have not connected to the HI Service then your software is allowing manual entry of HPI-I or HPI-Os. If you have conducted a HI Service implementation then you may still be allowing manual entry of these identifiers. In either case you must ensure that the HPI-Is and HPI-Os are validated as per the rules above. Some basic guidance is provided below as a guide only.
1. To check the identifier is stored as sixteen continuous digits (no spaces)
string ihi = "8003613233347467";
var valid = Regex.IsMatch(ihi, "^[0-9]{16}$");
2. Identifier is validated using the Luhn check digit algorithm. Sample code for Luhn check digit validation is provided below.
/// <summary>Validates a 16 digit LUHN checked health identifier</summary>
/// <param name="healthIdentifierWithLuhnCheckDigit">16 digit health identifier that includes a LUHN check digit.</param>
/// <returns>Boolean : True if input is a valid LUHN checked number, False otherwise.</returns>

public static bool ValidateLuhnCheckDigit(string healthIdentifierWithLuhnCheckDigit)
{
    if (string.IsNullOrWhiteSpace(healthIdentifierWithLuhnCheckDigit) || healthIdentifierWithLuhnCheckDigit.Length != 16)
    {
        return false;
    }

    string luhnCheckDigit;
    try
    {
        luhnCheckDigit = Validation.CalculateLuhnCheckDigit(healthIdentifierWithLuhnCheckDigit.Substring(0, 15));
    }
    catch (Exception)
    {
        return false;
    }
    return luhnCheckDigit == healthIdentifierWithLuhnCheckDigit;
}

private static string CalculateLuhnCheckDigit(string healthIdentifier)
{
    int num1 = 0;
    bool flag = true;
    string str;
    try
    {
        for (int startIndex = 14; startIndex >= 0; --startIndex)
        {
            int int32 = Convert.ToInt32(healthIdentifier.Substring(startIndex, 1));
            if (flag)
            {
                int32 *= 2;
                if (int32 > 9)
                    int32 -= 9;
            }
            flag = !flag;
            num1 += int32;
        }
        int num2 = Convert.ToInt32(num1.ToString().Substring(num1.ToString().Length - 1, 1));
        if (num2 > 0)
            num2 = 10 - num2;
        str = healthIdentifier + num2.ToString();
    }
    catch (Exception ex)
    {
        throw new Exception(string.Format("ERROR calcualting health identifier LUNH check digit: {0}", (object)healthIdentifier));
    }
    return str;
}
3. The sixth digit of identifier equals to 1 if it represents HPI-I, 2 for HPI-O.
For example to check if identifier is HPI-I
string hpii = "8003618233347797";

if(hpii[5] == 1)
{
    // HPI-I
}
Conclusion
If you have followed this guide, and the previous guide closely and familiarised yourself with testing requirements then you are now ready to conduct testing and gain access to the production environment. Return to the previous guide for instructions on booking testing. Contact us on help@digitalhealth.gov.au for help or feedback on this material.